
In a previous article, we looked at how you could use CloudFront to do WordPress page caching. Using a content delivery network (CDN) is a great way to make your WordPress site fast for anyone on the planet.
That said, if you’ve ever had to deal with getting a good page speed insight score for a client, you know page caching is just one of part of the equation! There are other things necessary to optimize the performance of a WordPress site. One of them is image optimization.
Page speed insight expects you to have optimized images. As an example, this can mean converting gifs to pngs if they’re not animated. But, in most cases, it means converting images to the webp image format.
There’s currently talk of adding webp conversion to WordPress. But until that day, most of us install plugins that optimize images for us. That said, a lot of these plugins rely on (or try to upsell you) an image CDN to perform image optimization.
An image CDN is generally a better way to optimize images. They can do it seamlessly and require little to no integration with WordPress. For example, Bunny CDN has an optimizer product that’ll do image optimization on the fly for you. No plugin needed.
Now, CloudFront doesn’t have an image optimizer product like Bunny CDN does. Ymir can configure one for you. But if you’re not using Ymir, you’re not without options either. It’s actually quite simple to create a simple image optimization CDN with CloudFront using a Lambda@Edge function.
This isn’t a WordPress article per se
Now, I’ve mentioned a WordPress a few times already. That said, I think it’s worth clarifying that this article isn’t about showing you how to configure CloudFront as an image optimizing CDN for WordPress only. You can use what you’ll see to create an image optimizing CDN for whatever use case you might need one for.
If you’re looking to know how to set up CloudFront with WordPress, there’s an in-depth guide for that already. This article will use the CloudFront distribution from that guide. But it’s only using it as a CloudFront configuration example.
As you’ll see then, there’s nothing WordPress specific about how to configure CloudFront. So keep on reading if you want to learn how to set up an image optimizing CDN with CloudFront!
How does an image CDN work?
So with this out of the way, let’s start by looking at the architecture of our image CDN. There are different ways to architect one, and each has some advantages and tradeoffs. With our image CDN, we want to keep the architecture as simple as possible. That’s why we’re going to rely solely on a single Lambda@Edge function.
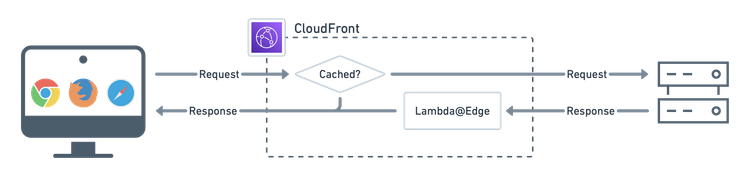
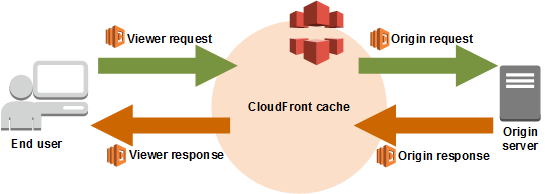
The diagram above shows how this works. CloudFront receives a request. If there’s a cache hit, it returns the cached response. Otherwise, it forwards the request to the origin.
Our Lambda@Edge function kicks in when the origin returns a response. If the response is an image that it can optimize, it’ll do so. The response from the Lambda@Edge function then gets sent to CloudFront, which caches it.
Architectural tradeoffs
As you can see, this architecture is quite simple, but comes with some tradeoffs. The first one is that CloudFront doesn’t save optimized images anywhere. This means that, when our Lambda@Edge function runs, it’s only optimizing the image for a specific CloudFront regional edge location.
So, for example, if someone requests an image from New York, our Lambda@Edge function will run and optimize there. But, if someone requests the same image from London afterwards, CloudFront won’t have an optimized image saved there. So our Lamba@Edge function will need to run once more to generate one.
This means that a Lamba@Edge function has to run multiple times to optimize an image. This won’t really increase your costs compared to if you stored the optimized image on S3. That’s because there are only 13 regional edge cache locations where your Lambda@Edge function can run. So once CloudFront optimizes the image in those 13 regional edge caches, it’ll have actually optimized the image across the entire CloudFront network..
Another thing to keep in mind with this architecture is Lambda@Edge restrictions. Specifically, Lambda@Edge has a response limit of 1.33MB for base64 encoded response bodies. This means that we can’t have CloudFront optimize images that are larger than 1.33MB base encoded.
In a lot of situations, this might be a non-issue. For example, WordPress creates smaller dimension version of images and those are almost always smaller than 1MB. These would get optimized fine with this architecture.
But if your goal is to have a CloudFront image CDN that optimizes high resolution DSLR pictures, then this won’t be the right architecture for you. This is when you’d want to look into an architecture that saves the optimized images to S3 as opposed to doing it inside the Lambda@Edge function.
Creating our Lamda@Edge function
Since the Lamda@Edge function is central to the image CDN, we’ll start with that. First, you’ll want to create a new JavaScript project for the Lamda@Edge function.
$ npm initOnce the project created, you’ll want to install the dependencies that we’ll need.
$ npm install --platform=linux --arch=x64 animated-gif-detector
$ npm install --platform=linux --arch=x64 node-fetch@2
$ npm install --platform=linux --arch=x64 sharp
You’ll notice the --platform=linux and --arch=x64. If you don’t specify these, npm will install libraries compatible with your local development environment. However, your local development environment isn’t necessarily the same as the Lambda@Edge one, and that can cause problems. (That’s what happened to me because I use an M1 MacBook Pro.)
Now, speaking of the dependencies, we have animated-gif-detector. This is the library that we’ll use to detect if we have an animated gif or not so we can convert it to a png if it’s not animated.
After that, we have node-fetch. This library ports the Fetch API to node.js. We need this to fetch the original image that we want to optimize via the CDN.
Finally, there’s sharp. This is the most important dependency of the project. It’s the library that we’ll use to optimize the image that we fetch using node-fetch.
Lamda@Edge function code
Now that we’ve created our JavaScript project and added the required dependencies, we can create our Lamda@Edge function. Below you’ll find the basic image optimization function that you can use with CloudFront. You should put this code in a file named index.js.
// index.js

'use strict';

const animated = require('animated-gif-detector'),
      fetch = require('node-fetch'),
      sharp = require('sharp');

exports.handler = async (event, context, callback) => {
    try {
        const allowedContentTypes = ['image/gif', 'image/jpeg', 'image/png'];
        const request = event.Records[0].cf.request;
        let response = event.Records[0].cf.response;
        const responseContentType = response.headers['content-type'][0].value;

        if ('200' !== response.status
          || !allowedContentTypes.includes(responseContentType)
          || ('image/gif' === responseContentType && animated(response.body))
        ) {
            return callback(null, response);
        }

        let newContentType = null;
        const originalImage = await fetch(`https://${request.headers.host[0].value}${request.uri}`);
        const originalImageBuffer = await originalImage.buffer();
        const sharpImage = sharp(originalImageBuffer);

        if ('image/gif' === responseContentType) {
            sharpImage.png();
            newContentType = [{ value: 'image/png' }];
        }

        if (request.headers['accept'] && request.headers['accept'][0].value.match('image/webp')) {
            sharpImage.webp();
            newContentType = [{ key: 'Content-Type', value: 'image/webp' }];
        }

        const sharpImageBuffer = await sharpImage.toBuffer();
        const responseBody = sharpImageBuffer.toString('base64');

        if (1330000 < Buffer.byteLength(responseBody)) {
            return callback(null, response);
        }

        if (newContentType) {
            response.headers['content-type'] = newContentType;
        }

        response.body = responseBody;
        response.bodyEncoding = 'base64';

        callback(null, response);
    } catch (error) {
        console.log(error);
    }
};
Initial guard clause
There are several sections to the code. To begin, we have a guard clause. The guard clause checks a few things:
- The HTTP status code of the response. We need it to be
200. - The
Content-Typeheader. We need it to be an allowed content type (image/gif,image/jpegorimage/png) for optimization. - Whether we have an animated gif using the
animated-gif-detectorlibrary. We don’t want to optimize an animated gif.
If we have a response with a 200 status code, the right content type and it’s not an animated gif, we proceed with the optimization.
Fetching the original image
To begin, we’ll need to fetch the original image using the fetch function we imported from the node-fetch package. To get the original image URL, we need to rebuild it using the Request object we stored in the request variable. We pass the rebuilt image URL to the fetch function and use await to make the request synchronous.
From there, we need to convert the image we fetched to a Buffer object using the buffer method. Since this is also an asynchronous method, we need to use await again. Once we have the Buffer object, we can pass it to the sharp function to initialize our Sharp object, which we use to optimize the image.
Optimizations
The first optimization that we do is convert a non-animated gif to a png. Next, we check the Accept. This Accept header will tell us if the browser requesting the image supports webp or not. We only do the webp conversion if the Accept header has image/webp in it.
You’ll also notice that, each time we do a transformation, we update the newContentType variable to match the new image type. This is important to update the Content-Type header later. This is the header that lets browsers know that, even though the image extension might not be .webp, it’s, in fact, a webp image. (It’s also a handy way to see that the image CDN works!)
Returning the optimized image
The last thing to do is to replace the response body with our optimize image. We do this in a few steps. First, we convert our sharpImage to a Buffer object with the use of await to make it synchronous. We then use that Buffer object to convert the image to a base64 string which we store in responseBody.
As we saw previously, there’s a 1.33MB limit for Lambda@Edge responses. To deal with this issue, we use Buffer.byteLength to calculate how big our base64 encoded string is. If it’s over 1330000 (or 1.33MB), we want to abort without replacing the body of the response. This will make CloudFront return the original image instead of an error.
Next, we check newContentType isn’t null. If it isn’t, we update the response Content-Type header. After that, we replace the response body with the content of responseBody. We also want to update the response.bodyEncoding to reflect the fact that the image is a base64 encoded string.
Packaging
Now that we finished coding our Lamda@Edge function, we need to upload it to AWS. To do that, we’ll need to package it with all the node_modules that installed using npm. We can do this easily by adding a script under scripts in our package.json file.
{
  "name": "image-processing",
  "version": "1.0.0",
  "author": "Carl Alexander",
  "description": "Lambda@Edge function used for image processing",
  "license": "MIT",
  "main": "index.js",
  "dependencies": {
    "animated-gif-detector": "^1.2.0",
    "node-fetch": "^2.6.7",
    "sharp": "^0.30.2"
  },
  "scripts": {
    "build-zip": "rm image-processing.zip; zip -r image-processing.zip ./node_modules/ index.js"
  }
}
The build-zip script creates the image-processing.zip archive containing all the code we want to deploy to AWS. It first deletes an existing image-processing.zip archive if present. Then it recreates the zip archive by adding everything in node_modules as well as the index.js file containing the function code.
You can run the script using the following command:
$ npm run build-zipOnce we created the image-processing.zip, we can move on to AWS to configure everything.
Creating our Lambda function
The first step is to create the Lambda function using the code that we just put in the image-processing.zip archive. To do this, go to the Lambda console and click Create function.

This brings you to the initial page of the function creation, which you can see below. I’m naming the function image-processing. For the runtime, I selected Node.js 14.x*. There’s no specific reason for the choice. It’s just the latest Node.js version.
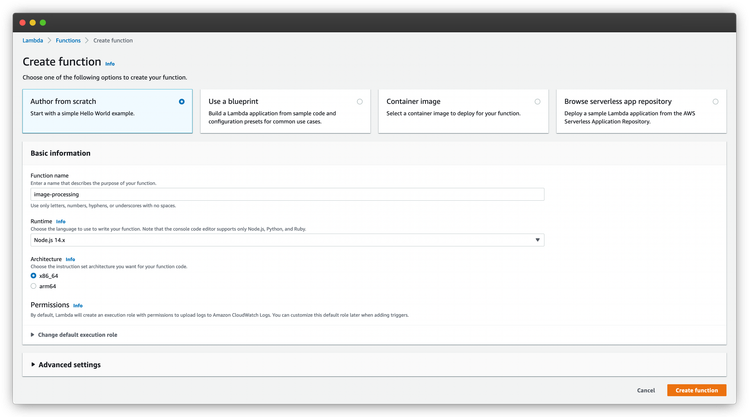
For the architecture, I’m using the default x86_64. If you want to use arm64, it’s cheaper, but not everything is compatible with it. If you want to use that architecture, make sure you use --arch=arm64 when installing packages with npm.
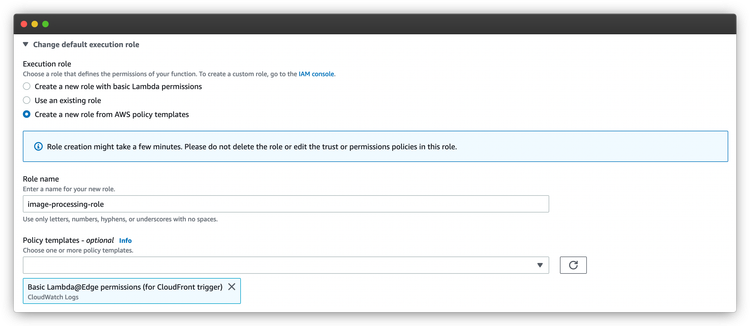
Next, you’ll want to expand the Change default execution role section. You’ll need to create an IAM role for the function. Select Create a new role from AWS policy templates and give it a name. Under Policy templates, you want to select Basic Lambda@Edge permissions.
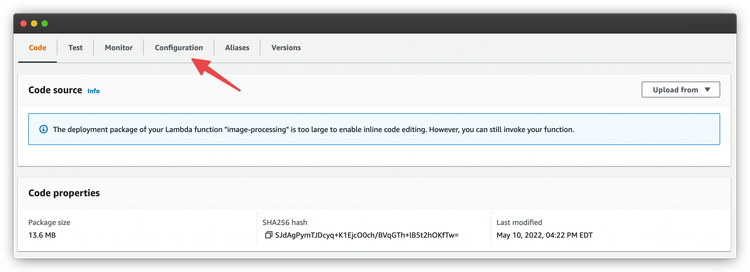
This is all that you need to configure for your Lambda function. So you can click on Create function and it’ll bring you to the created function screen. There, you’ll want to upload image-processing.zip using Upload from dropdown menu.

Changing the default configuration
Once that’s done, we need to alter the default function configuration. You’ll need to click on the Configuration tab. This will bring up the tab with a new tab navigation on the left.
You should already have the General configuration left tab selected. You’ll want to click Edit button on the right. This allows us to edit some important configuration options for our function.
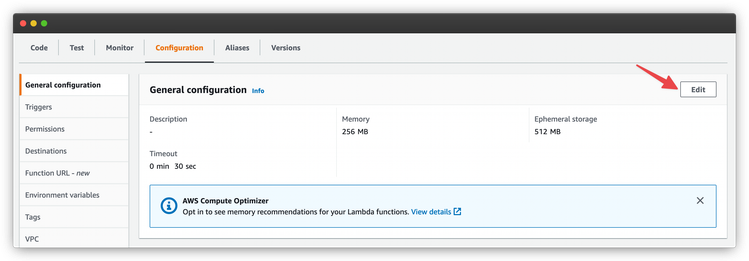
First, you’ll want to edit the Memory. By default, your Lamba function has 128MB of RAM. This is too little to optimize most images. A better default value is 256MB. If you’re optimizing large images, you might want to increase it further.
Second, you’ll want to change the Timeout value. The default is 3 seconds, which is way too short to optimize images. You’ll want to put 30 seconds.
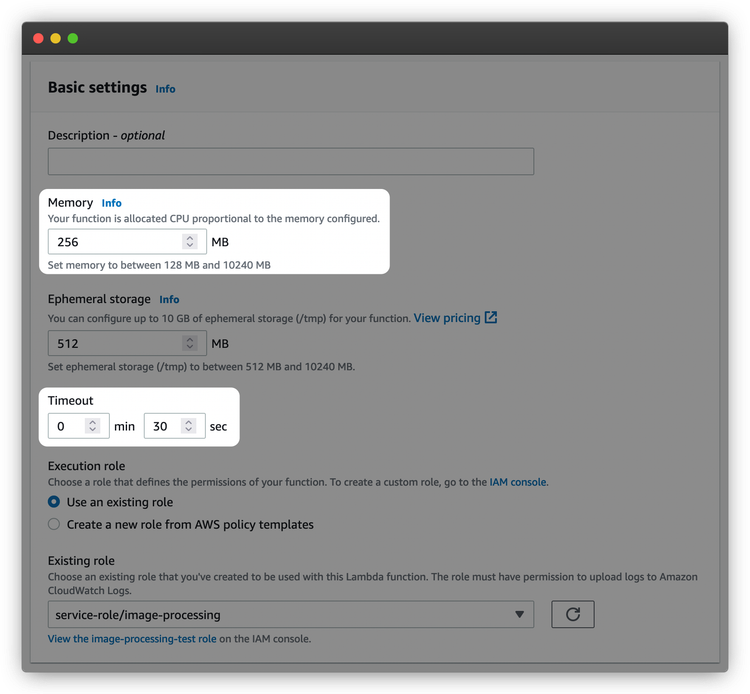
Above is a screenshot with the updated settings. You’ll just want to click Save to apply them.
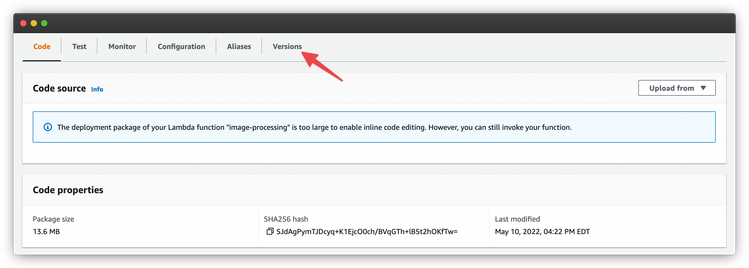
Publishing a new version of the function
Next, we need to publish a new version of the function. This is necessary because you can only connect a specific function version to a CloudFront distribution. To begin, click on the Versions tab.
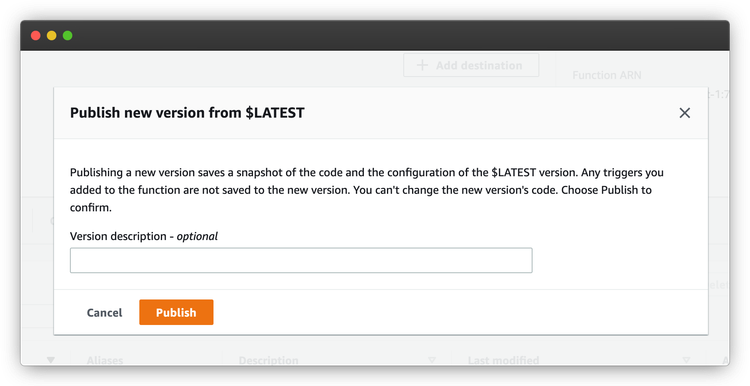
There you want to click on the Publish new version button in the top right. It’s also in the middle if you never created a function version before.

Once you click on the button, you’ll get a modal where you can put an optional description for the version. You’ll just want to click on Publish and this will create the new function version.
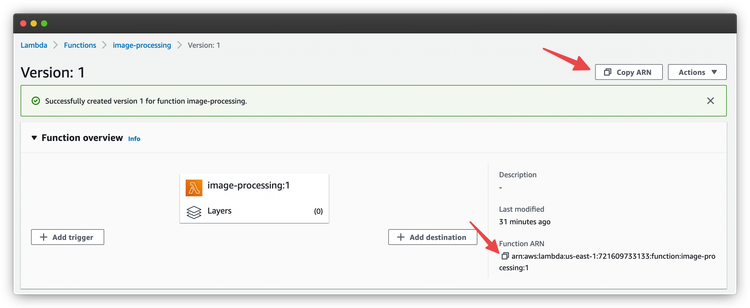
This will bring you to the console page for this specific Lambda function version. You should also see a function version created banner. There, you’ll want to copy the Amazon Resource Name (ARN) of the function version. There are two buttons you can click to copy it to the clipboard.
Configuring CloudFront
The last step is to configure CloudFront to use our Lambda@Edge function. As a reminder, for this article, we’re going to update the CloudFront distribution created in a previous article. But, as you’ll see, it’s pretty easy to do this with any CloudFront distribution.
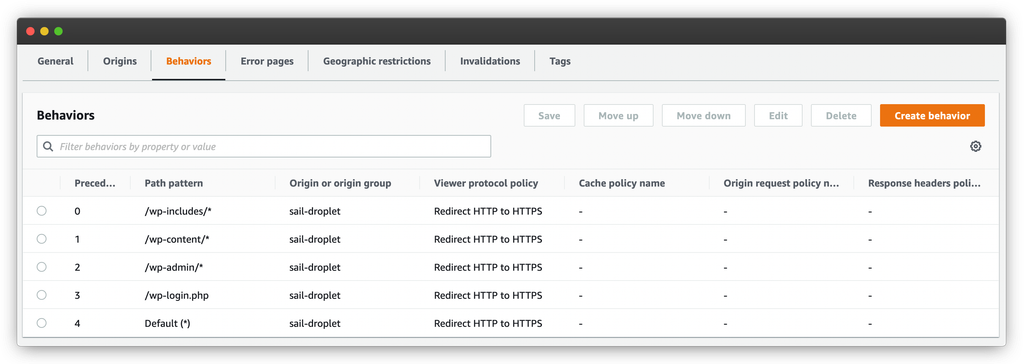
To use a Lambda@Edge function, you need to attach it to a cache behavior. Our CloudFront distribution has five behaviors which you can see above. You don’t need to attach the Lambda function to all five cache behaviors. You should only attach it to cache behaviors which deal with images.
With WordPress, most images are in the /wp-content/uploads directory. So we’re going to edit the cache behavior for /wp-content/*.
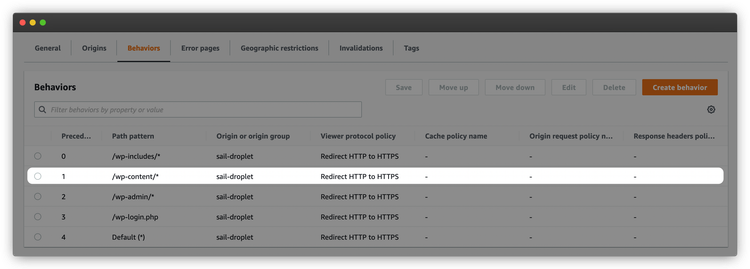
Editing the /wp-content/* behavior will bring you to the large cache behavior configuration screen. First, you’ll want to scroll down to the Cache key and origin requests section. There, you’ll want to add the Accept header to the list of cached headers.
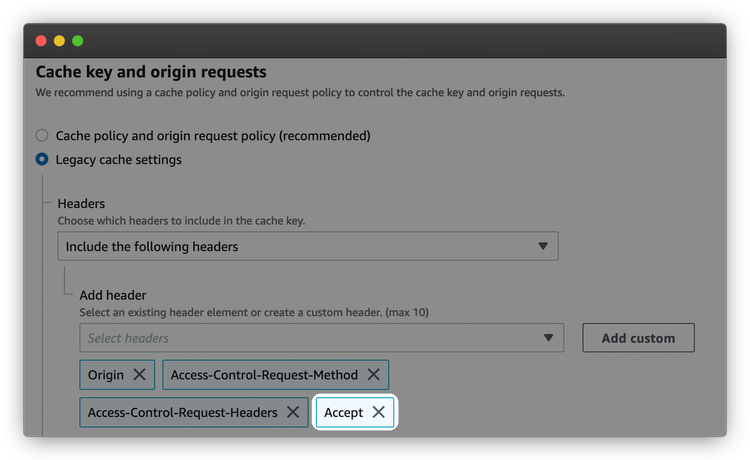
This is necessary so that the Accept header makes it to our Lambda function. (CloudFront will remove it otherwise.) If you don’t do this, our Lambda function won’t know if the request supports webp or not. So it’s a very important setting to change!
After that, you want to scroll all the way to the bottom of the page to the Function associations section. There you’ll find four possible function associations.
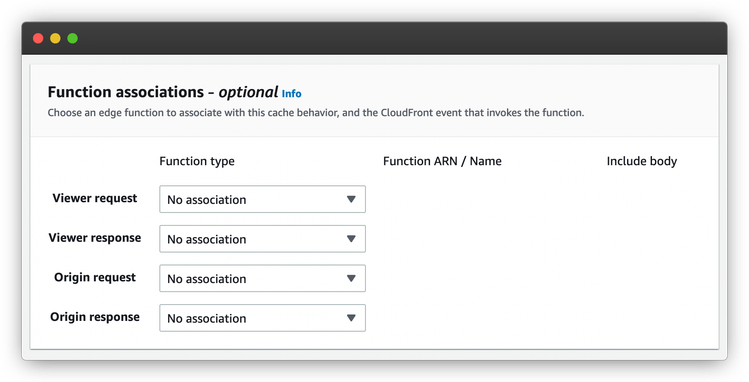
We won’t go through all four of them. The AWS diagram below shows where each function runs during the lifecycle of a request to CloudFront. For what we’re trying to do, we want to associate our Lambda function to Origin response.
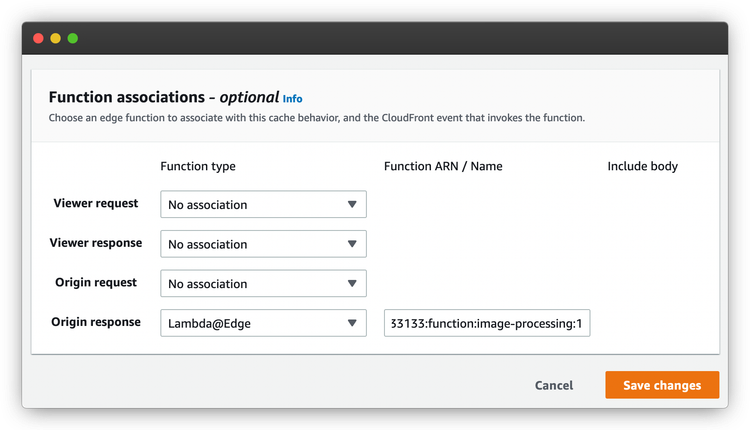
So you’ll want to click on the No association dropdown and select Lambda@Edge. In the text box next to it, you’ll want to paste the function ARN that you copied earlier. After that, you can click on Save changes right below.
This will cause your CloudFront distribution to start updating. This process can take up to 20 minutes. So wait until it’s done updating to check if everything is working.
Your personal image CDN
That said, if you’ve followed everything so far, you should see that your images are getting optimized now! This is easy to test. Just request an image that was previously in another format and you should see it returned as a webp.

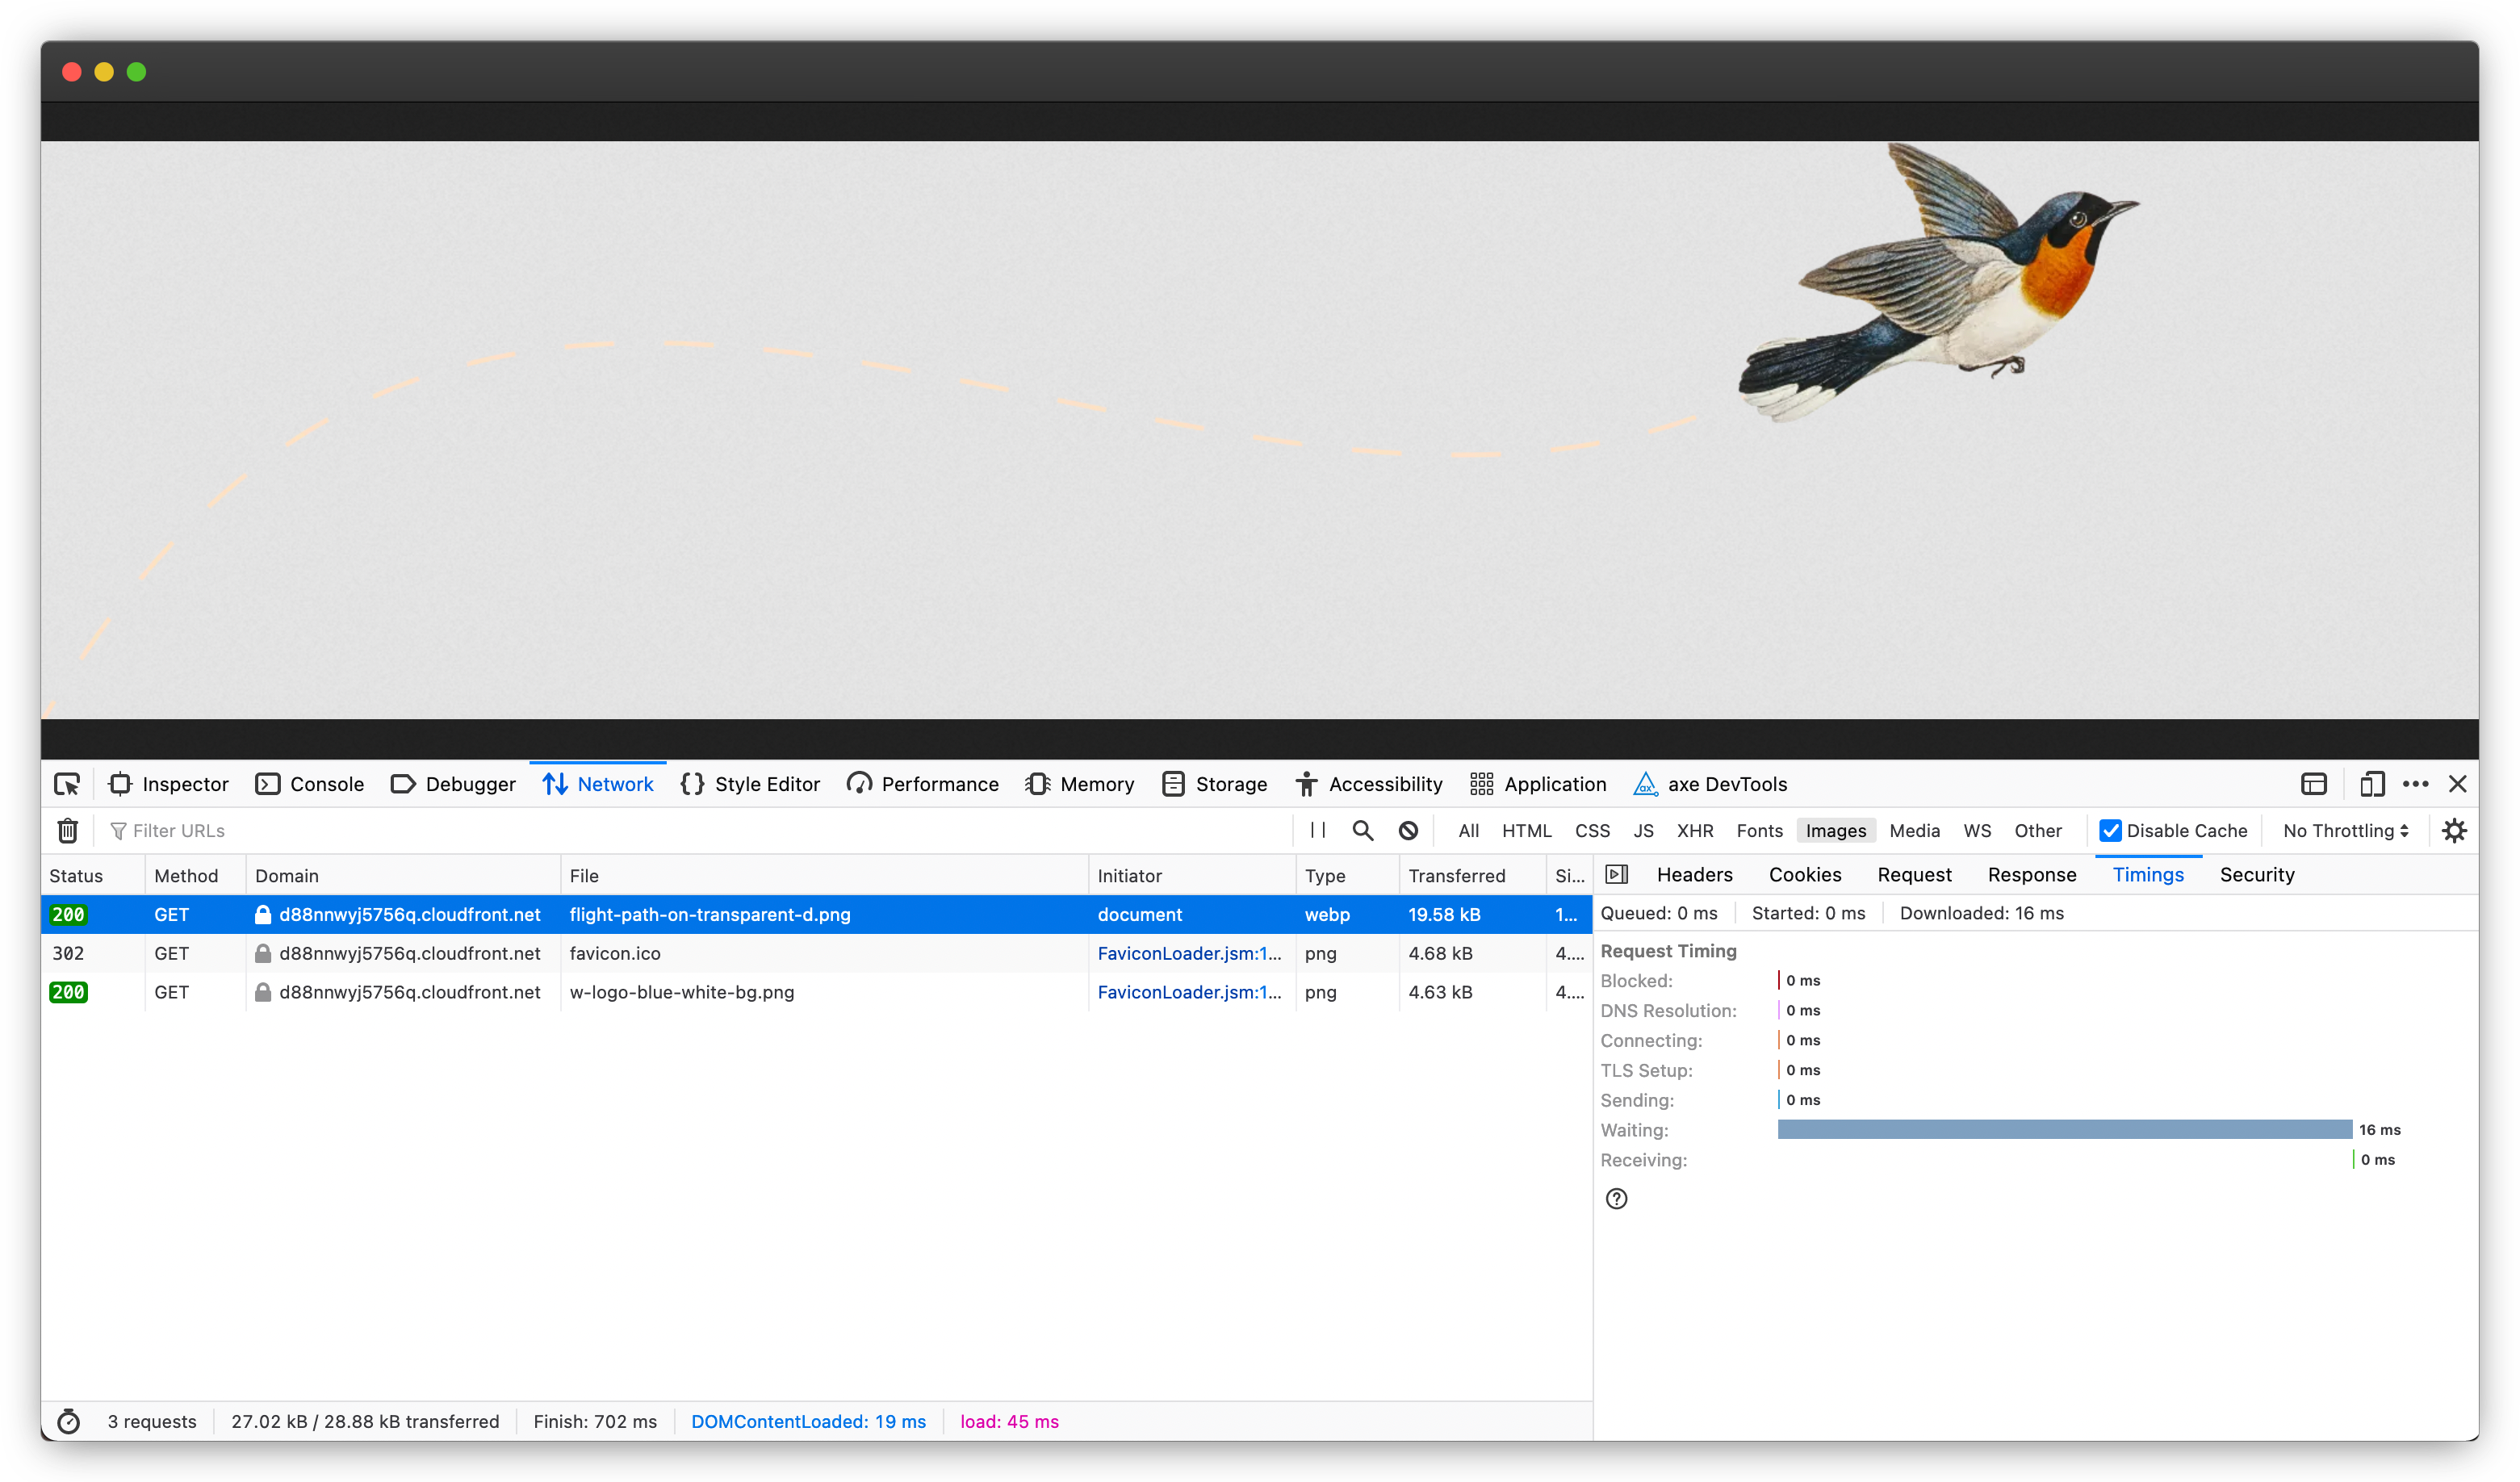
Above is an example with the Twenty Twenty-Two default theme image. You can see that it’s got a .png extension, but the returned Content-Type is webp. That’s how you can see it in action.
As I mentioned earlier, there are tradeoffs with this approach. If you’re dealing with high-resolution images, you’re going to hit that 1.33MB limit. If that’s the case, you’ll want to look into an architecture that optimizes images and saves them to S3. Or it might be better to just look into an image optimizing CDN instead.
That said, if you’re dealing with regular sized images like the one in the above example, you’ll notice it’s only around 19kB in size. This is far from the 1.33MB limit. In that scenario, this architecture is more than capable of handling your image optimization needs.
And it’s so simple that you don’t even need a WordPress plugin to do it!