Ymir, the WordPress serverless DevOps platform that I’m building, has a lot of distinct parts. There’s the Laravel application which I’ve talked about. But there’s also a WordPress plugin that acts as the bridge between the AWS infrastructure and WordPress.
Part of the bridging process revolves around offloading certain tasks to WP-CLI. This was an architectural decision which deserves its own article. (You can read a short Twitter thread on it here.) That said, this meant that each offloaded task needed its own WP-CLI command.
And there were quite a few tasks to offload! This was an opportunity to use object-oriented programming to design a new system for WordPress. This system will handle the creation and registration of these WP-CLI commands.
How do you create a WP-CLI command?
WordPress has an excellent guide on WP-CLI commands. It covers a lot of different topics surrounding WP-CLI commands. That includes how to create them.
Creating a WP-CLI command revolves around the WP_CLI::add_command static method. The method has three arguments: name, callable and args.
name is the full name of the command. For example, wp core install would have core install as the name. This is important to keep in mind since it’s a good idea to prefix all your commands.
callable is a PHP callable pseudo-type. This means that you can pass it a lot things. It can be a string with a function name, an anonymous function, an array with an object and method name and more. (There are 6 different callable types in total.)
The last argument is args. args is an associative array containing all the WP-CLI command configuration options. You can also use PHP annotations instead. But for our system, we’re going to rely on the associative array.
WP-CLI command configuration options
These configuration options are an essential element of creating a WP-CLI command. So we’re going to take a moment to go over some of them. To put things into context, let’s take a look at the help output of the wp core install command.
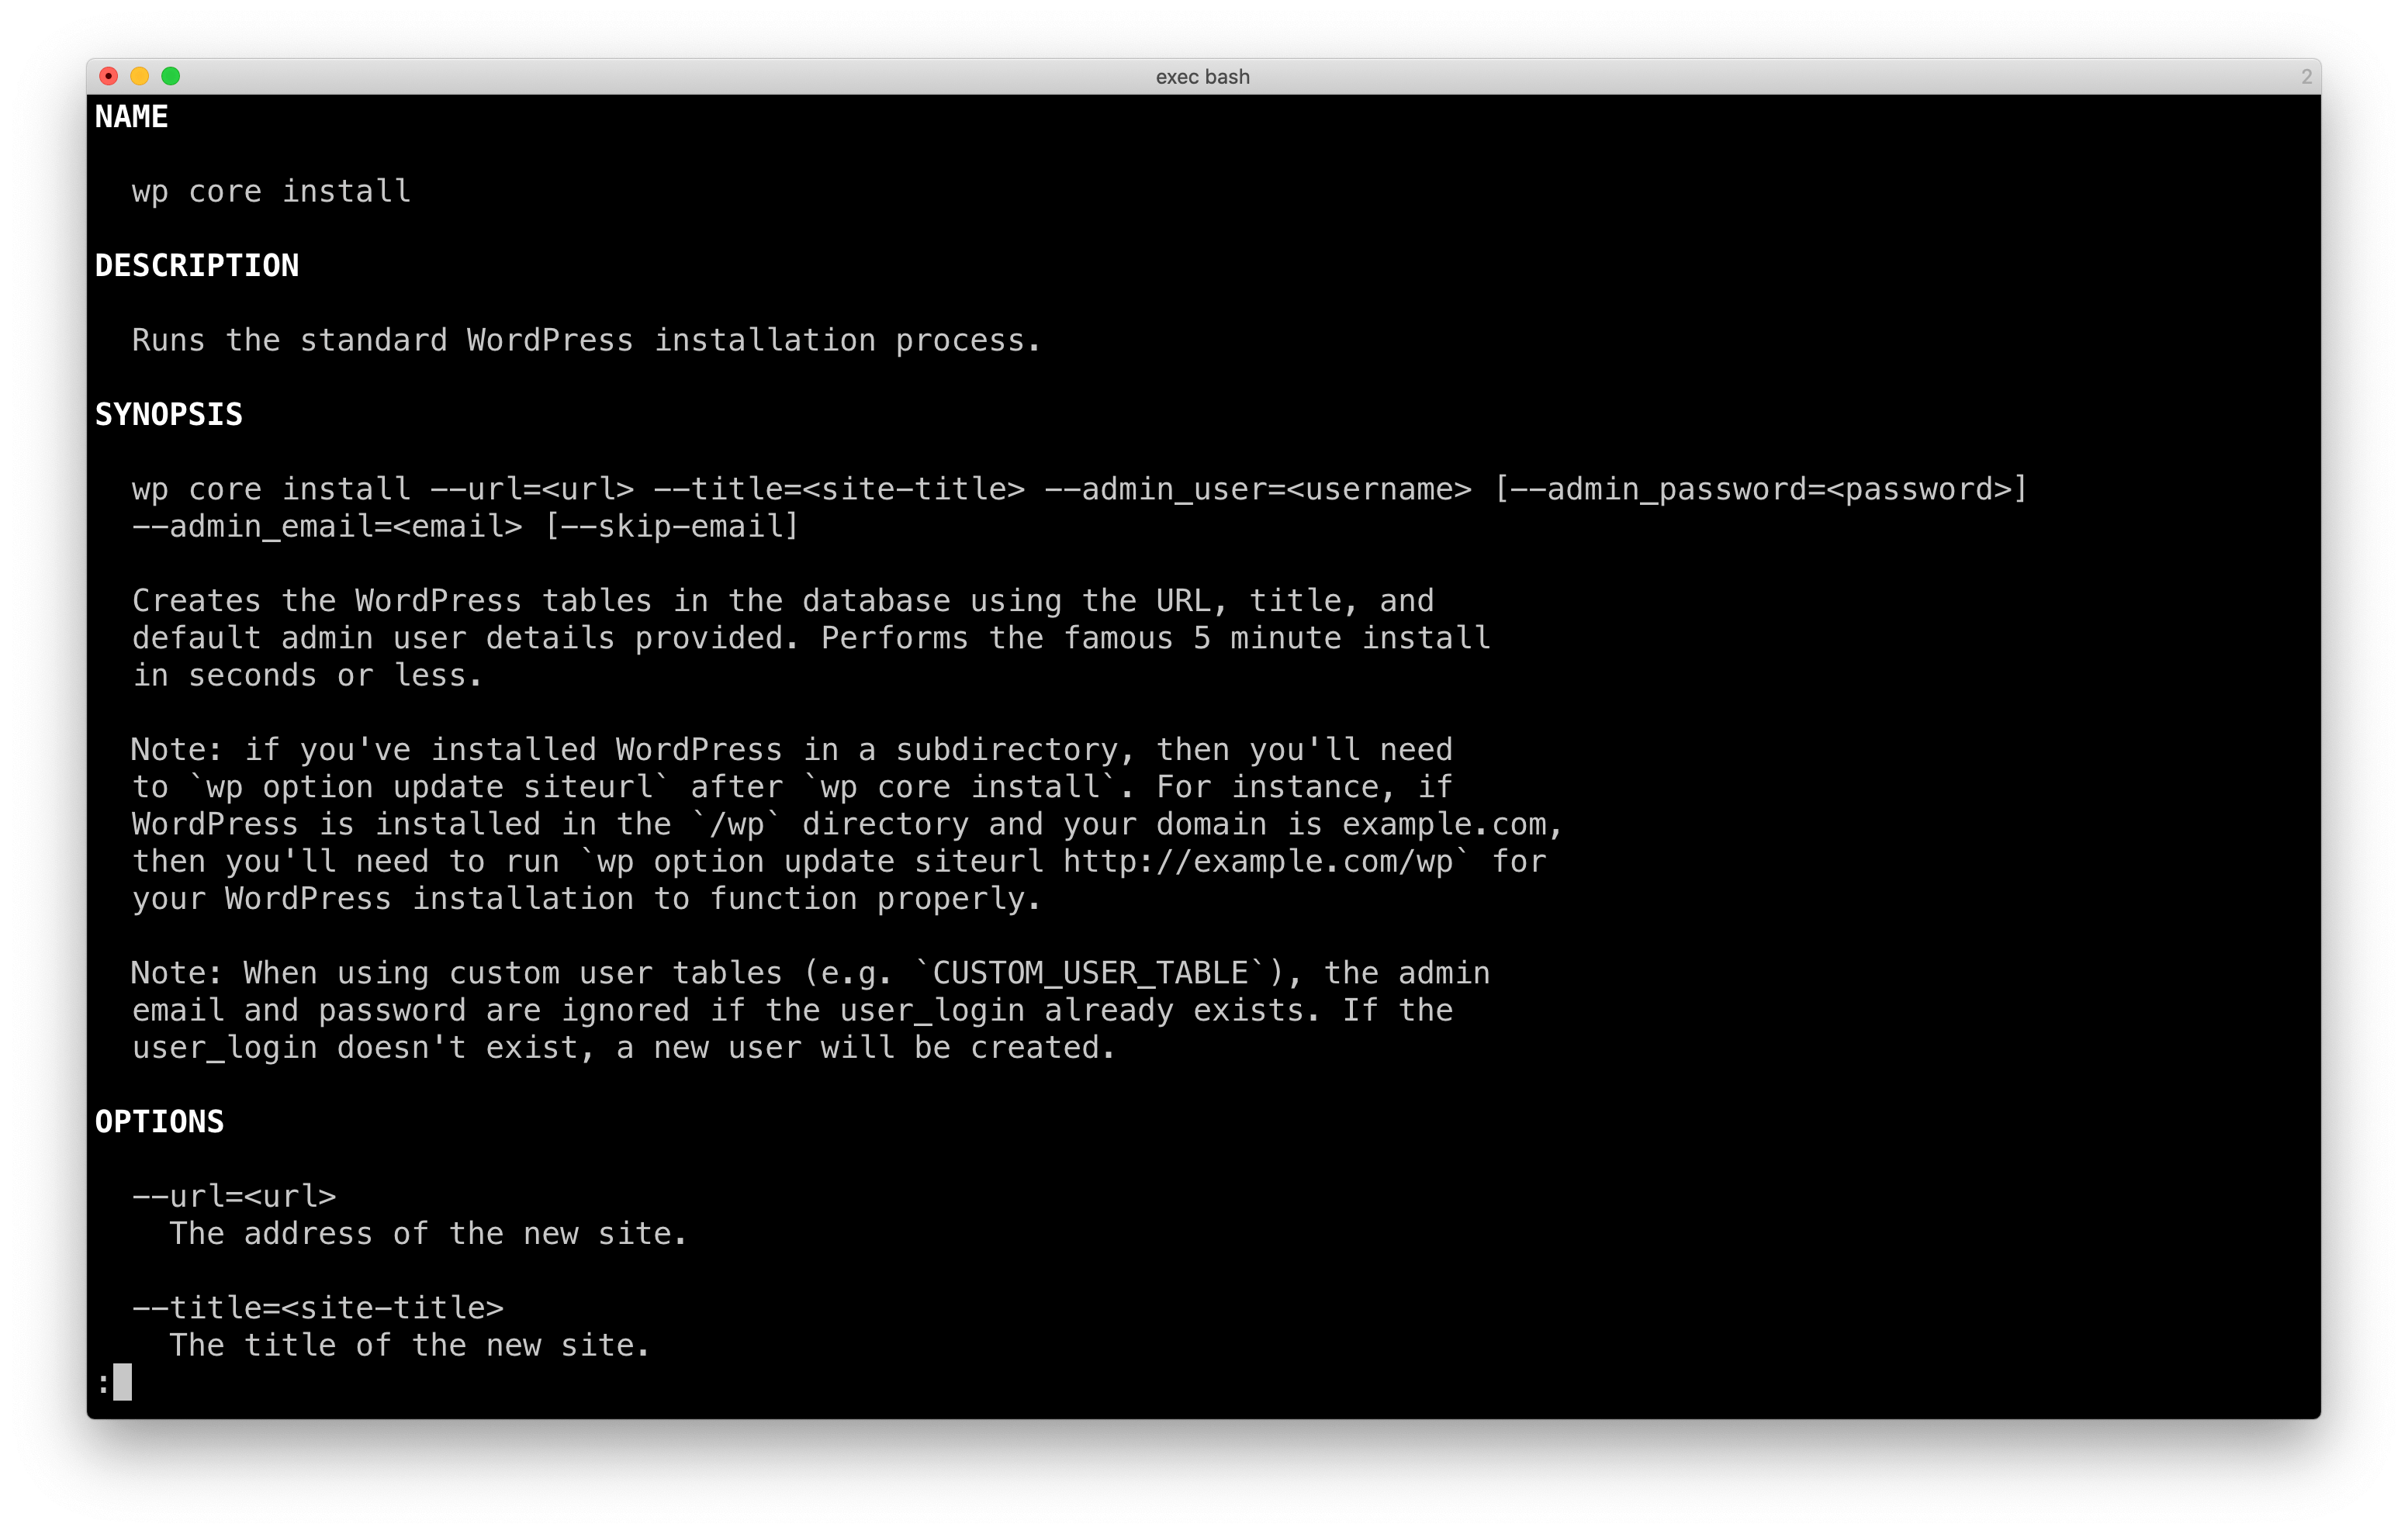
The first section that we’re interested in is the DESCRIPTION section. This is the short description for the command. You can see it here and when you list subcommands using wp help core. You can set the short description using the shortdesc option.
Below the DESCRIPTION section is the SYNOPSIS section. Here you can see the complete wp core install command with all its arguments and options. You can configure all these arguments and options for your command using the synopsis option.
The synopsis option is the most important, but also the most complicated option. Each argument or option is represented using an associative array. There are a lot of different options that you can use in it. We’ll discuss them in the next section.
Below the full wp core install command and its arguments and options is the long description. You can set it using the longdesc option. For this article, we’re not going to make use of it, but you’ll see that it isn’t hard to add support for it if you so choose.
Command arguments and options
In a lot of cases, the command you need to create is going to need a combination of arguments and options. What are arguments and options. Let’s take a look at the wp plugin install command.
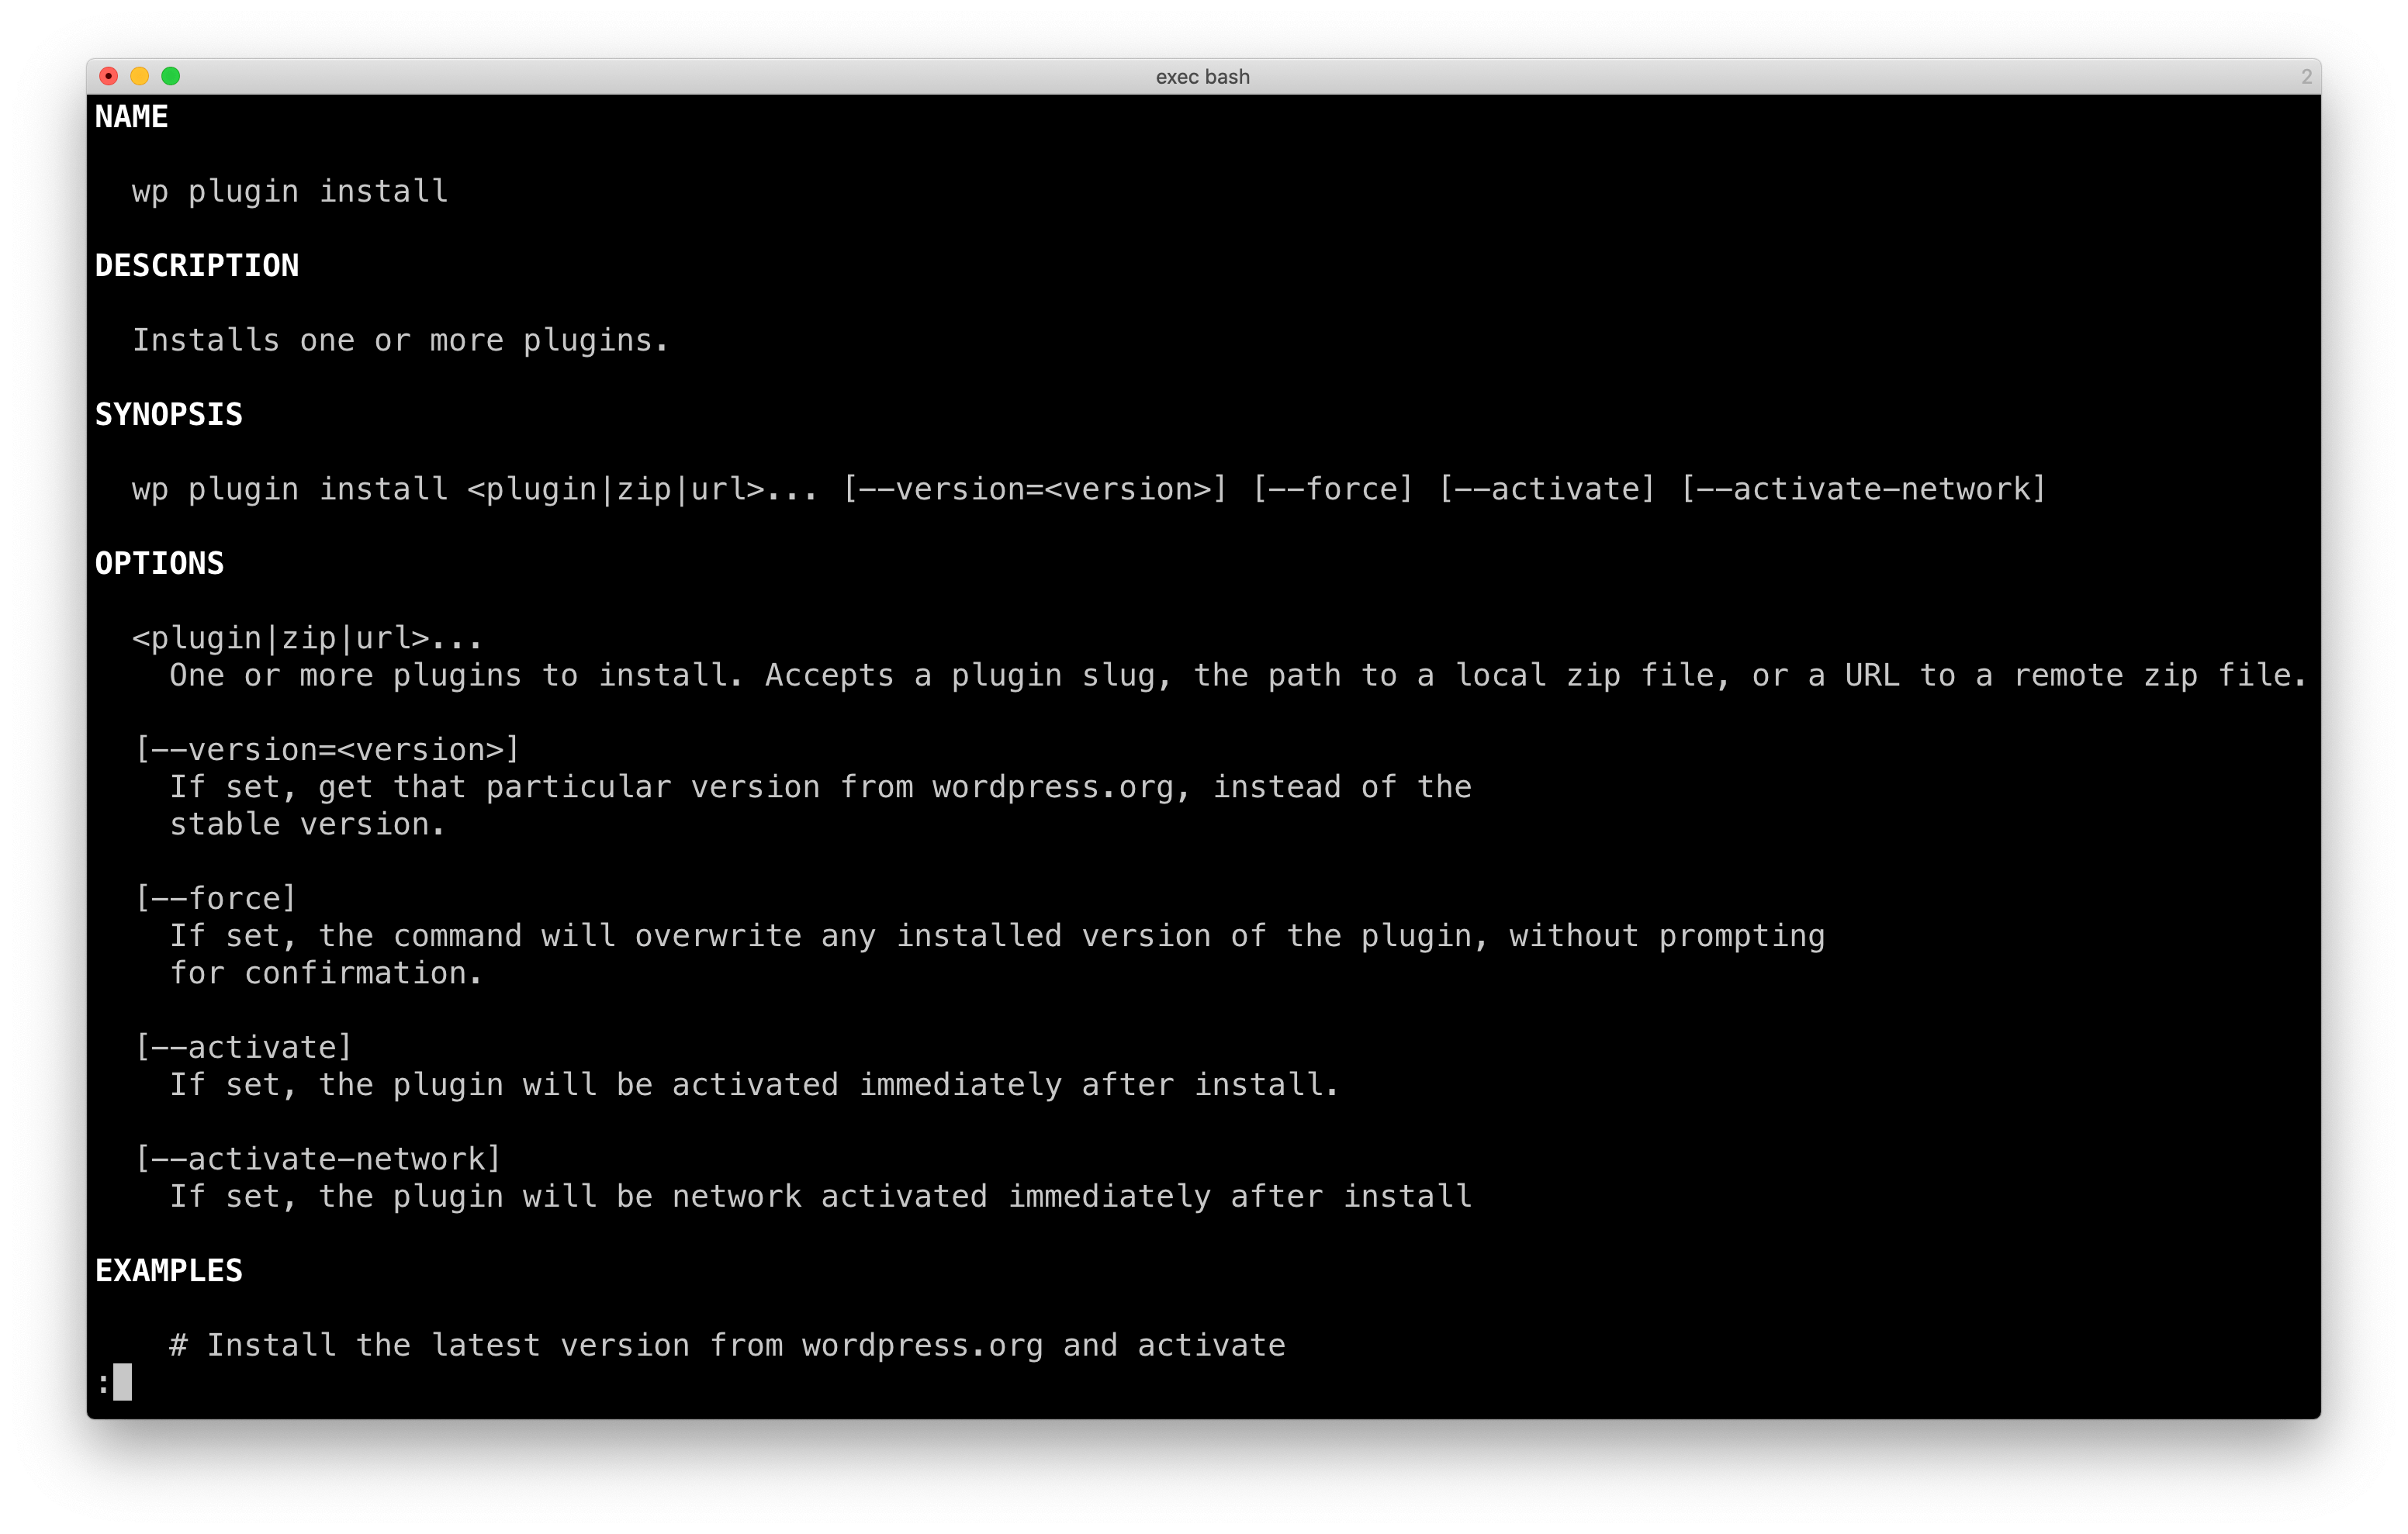
Looking at the output from the wp help plugin install command. The argument for the command is <plugin|zip|url>.... This is the space separated list of plugins to activate. The options for the command is everything else starting with --.
Arguments are always the first elements after the name of the command. The order that you pass them to the command is also important. That’s because they don’t have a name like with options. (The name in the help command is only for reference.)
In general, options (also known as flags or switches) are optional. (Hence the name!) For some, you can pass a value or values. For others, they don’t accept a value. WP-CLI uses the term “flag” when talking about an option without a value.
When choosing between arguments and options, it comes down to a few things. If you need something all the time, you need to use an argument. That’s because only arguments can be required.
If your argument is optional, you could make it an option or vice versa. There’s no clear define rule for those. In general, I tend to use options if it’s something that modifies the behaviour of the command. Otherwise, I use arguments.
Defining arguments and options
Now, how do you define arguments and options in the synopsis? Well, WP-CLI uses an associative array of options to configure them. Here’s a look at the example from the cookbook:
$hello_command = function( $args, $assoc_args ) {
    list( $name ) = $args;
    $type = $assoc_args['type'];
    WP_CLI::$type( "Hello, $name!" );
    if ( isset( $assoc_args['honk'] ) ) {
        WP_CLI::log( 'Honk!' );
    }
};
WP_CLI::add_command( 'example hello', $hello_command, [
    'shortdesc' => 'Prints a greeting.',
    'synopsis' => [
        [
            'type' => 'positional',
            'name' => 'name',
            'description' => 'The name of the person to greet.',
            'optional' => false,
            'repeating' => false,
        ],
        [
            'type' => 'assoc',
            'name' => 'type',
            'description' => 'Whether or not to greet the person with success or error.',
            'optional' => true,
            'default' => 'success',
            'options' => ['success', 'error'],
        ],
        [
            'type' => 'flag',
            'name' => 'honk',
            'optional' => true,
        ],
    ],
]);
The first option is the type. There are three available types with WP-CLI: positional, assoc and flag. positional and assoc are the argument and option as described just before. Meanwhile, flag is an option that doesn’t need a value.
Next, we have the name. That’s the name of the argument, option or flag. If it’s an argument, the name only appears when you do wp help along with the description. But for options and flags, it’s what you add after the --.
After that, we have have the optional option which determines if an argument or option is required. If something is optional, you can use the default option to set a default value. You can also set the allowed values for an option or argument with the options option. (It’s a lot of different uses of the word option. Sorry!)
The last option is repeating. This is a flag that tells WP-CLI if you can repeat an argument multiple times. For example, <plugin|zip|url>... with wp plugin install is a repeating argument. You can use wp plugin install plugin1 plugin2 plugin3 to activate all three plugins at once.
Using classes with WP-CLI
Last, we want to discuss how classes work with WP-CLI. Classes are a bit more complicated to use than if you wanted to use a function. That’s because WP-CLI has two different behaviours depending on the type of class you pass it.
We’re going to have to pick one of the two when we design our system. That’s why it’s important to understand what their advantages and disadvantages are. With that said, what are those two different behaviours?
Regular class behaviour
The first one happens if you pass WP_CLI::add_command what we’d consider to be a “regular class”. It’s the type of class that we’re used to working with all the time. It has public methods to expose its internal behaviour. You basically interact with these classes using these public methods.
If you pass WP_CLI::add_command a regular class, it will register every public method in that class as a command. Here’s an example of what we mean by that.
namespace MyPlugin;

class WpCliCommands
{
    // ...

    public function command1()
    {
        // ...
    }

    public function command2()
    {
        // ...
    }
}
$commands = new WpCliCommands();
\WP_CLI::add_command('myplugin', $commands);
The code above will register the WpCliCommands class with WP-CLI. During the registration process, WP-CLI will register all the public methods as commands. So you’re going to have both wp myplugin command1 and wp myplugin command2 as available commands in WP-CLI.
This behaviour is great if you want to keep all the code for your WP-CLI commands together under one class. It’s not so great if you want each command to be its own class. This is useful if each command has its own dependencies that you want to inject.
Invokable class behaviour
The other type of class behaviour happens if you pass WP_CLI::add_command a callable object. A callable object is an object that you can call like a function. Here’s how it looks in PHP:
class InvokableClass
{
    public function __invoke($text)
    {
        echo $text;
    }
}
$object = new InvokableClass();
$object('test');
As you can see above, we used object like a function. Using it as we did would echo test which we passed as an argument. It’s common in the PHP world to call callable objects like the one we just saw “invokable” because of the __invoke magic method. Implementing that magic method is what makes the class callable.
So what happens when you pass an invokable class to WP_CLI::add_command? Well, WP-CLI will disregard all other public methods and only register the __invoke method as a command. This means that using an invokable class lets you have self-contained command classes.
Picking a class type
For our system, we’re going to have to choose one of these two class types. This decision will impact how we design the entire system. So it’s not one that you should take lightly.
That said, for me, having self-contained classes has far more advantages than using a class to contain all the commands. My commands often have different dependencies. It makes little sense to have one class have all these different command dependencies.
Moving on to designing the system
With this important design decision out of the way, it’s time to move on to the system itself. Much like how we designed the REST API system, we’re going to design our system around a single function or method. That’s why it was important to understand how WP_CLI::add_command method works. It’s the method that we’ll design the system around.
Creating a command interface
The cornerstone of this system is going to be an interface. This interface will be the contract that our command classes will need to follow. It will allow us to create a bridge between these classes and the WP_CLI::add_command method.
namespace MyPlugin\Command;

/**
 * A WP-CLI command.
 */
interface CommandInterface
{
}
Above is a first pass at the CommandInterface interface that we’ll use for our command classes. We’re going to start with a clean slate. So, for now, the interface is empty.
Giving our command a name
A good first step is to add a way to get the name of the command to pass to the WP_CLI::add_command method. So we’ll add a method to our interface to do that.
namespace MyPlugin\Command;

/**
 * A WP-CLI command.
 */
interface CommandInterface
{
    /**
     * Get the command name.
     *
     * @return string
     */
    public function get_name();
}
The get_name method will be the one in charge of returning the command name. It’ll return it as a string.
Adding the __invoke method
Now that we have a way to return the name of the command the object represents, let’s move on to running the command. This is where the __invoke magic method that we’ve been discussing comes in. We’re going to add it to our CommandInterface interface.
namespace MyPlugin\Command;

/**
 * A WP-CLI command.
 */
interface CommandInterface
{
    /**
     * Executes the command.
     *
     * @param array $arguments
     * @param array $options
     */
    public function __invoke($arguments, $options);

    // ...
}
You can see the updated CommandInterface interface above. This __invoke method has two parameters: arguments and options. arguments is the array of arguments passed to the command. Meanwhile, options contain the command options sent with the command.
For example, let’s say you ran the wp plugin install bbpress --activate command. The arguments array would contain bbpress and the options array would have activate. So both parameters are necessary for our interface to do its job.
Configuring the command arguments and options
Speaking of the arguments and options parameters. We also need to define the arguments and options that our command will accept. As we saw earlier, we configure this in the synopsis of the command.
namespace MyPlugin\Command;

/**
 * A WP-CLI command.
 */
interface CommandInterface
{
    // ...

    /**
     * Get the positional and associative arguments a command accepts.
     *
     * @return array
     */
    public function get_synopsis();
}
So we’re going to create a method called get_synopsis. It’ll return the array we pass to the synopsis key of the args array that we pass to WP_CLI::add_command method.
Adding a description
Last, we might also want to add a description for the command that we’re creating. We’ll add a method to do that as well. Here’s the updated CommandInterface interface:
namespace MyPlugin\Command;

/**
 * A WP-CLI command.
 */
interface CommandInterface
{
    // ...

    /**
     * Get the command description.
     *
     * @return string
     */
    public function get_description();

    // ...
}
There’s a new get_description method which we can use to set a description for our commands. Earlier we saw that there were two keys in the WP_CLI::add_command method args array for descriptions. There was longdesc for the large text under the command synopsis. And shortdesc was for the description you see everywhere else.
For this system, we’ll have this system the get_description method will return the description for the shortdesc option. This is just to keep things a bit simpler. If you want to use longdesc instead or both, that’s fine. Don’t hesitate to tailor the interface to your needs!
Using the static keyword in the interface
Another potential design choice you might face is whether to make some of the interface methods static. In general, it’s better to avoid static methods. But there are situations where it can make sense to make a method static.
For example, you might want to make the get_name method static. This is useful if you want to refer to the command from elsewhere in your code. Using the get_name method would allow you to not hardcode the command name.
use MyPlugin\Command\MyCommand;

\WP_CLI::error(sprintf('Please run the "%s" command first', MyCommand::get_name()));
Above is a simple example showing how you could use the get_name method as a static method. We use the WP_CLI::error method to output a console error. The error message that we pass to it references another command to run first. We can just use the get_name static method to get the name of the command.
Now, you might not need to output error messages like this one in your code. In fact, you might not need to use any static methods at all. This is something that you need to figure out based on your needs.
It’s also possible that your needs might also change. It’s better to keep static methods to a minimum, but they’re still a valid tool at your disposal. So it’s good to know that this is a design option that’s available to you.
Using the command interface
Now that we have our CommandInterface interface, the next step is to use it! Since the interface maps to arguments of the WP_CLI::add_command method, connecting the two is pretty straightforward. Let’s take a look at how everything looks what we’ve connected everything.
use MyPlugin\Command\CommandInterface;

function myplugin_add_command(CommandInterface $command)
{
    if (!defined('WP_CLI') || !WP_CLI || !class_exists('\WP_CLI')) {
        return;
    }

    \WP_CLI::add_command($command->get_name(), $command, [
        'shortdesc' => $command->get_description(),
        'synopsis' => $command->get_synopsis(),
    ]);
}
Above is the myplugin_add_command function which we can use to register our command objects. We pass it a CommandInterface object. It then uses that object to populate the arguments of the WP_CLI::add_command method.
The first argument of the WP_CLI::add_command method is the name of the command. We get that using the get_name command. The second argument is the callable that WP-CLI will use when it wants to run the command. For us, this is the command object itself with its __invoke magic method.
The last argument is the args array with a variety of additional configuration options. With the CommandInterface interface, we’re only preoccupied with two options. Those are shortdesc which comes from the get_description method and synopsis which comes from the get_synopsis method.
It’s also worth pointing out the guard clause at the start of the function. It’s there to ensure that we only add the commands when we know the code is being run by WP-CLI. That’s the main purpose of the WP_CLI constant. To be safe, there’s also a class_exists check for the WP_CLI class.
Creating a base command class
One last that we can look at is how to create a base command class that we can reuse for allow our command classes. This is handy because there are few elements of a command that are reusable between classes. Let’s begin with an empty class which we’ll call AbstractCommand.
namespace MyPlugin\Command;

abstract class AbstractCommand implements CommandInterface
{
}
Default synopsis
The AbstractCommand class extends our CommandInterface interface. Because it’s an abstract class, the AbstractCommand class doesn’t need to implement every method in the CommandInterface interface. In fact, we’re only interested in two of those methods.
namespace MyPlugin\Command;

abstract class AbstractCommand implements CommandInterface
{
    /**
     * {@inheritdoc}
     */
    public function get_synopsis()
    {
        return [];
    }
}
The first method that we’ll add is the get_synopsis method. We’re just going to have it return an empty array. This lets us not have to worry about adding the method for commands that don’t need arguments or options.
Prefixing our command names
The next method that we want to look at is the get_name method. The reason we want to look at that method is because, in a lot of cases, you want to prefix your commands. They should all follow a format like wp my-plugin my-command.
namespace MyPlugin\Command;

abstract class AbstractCommand implements CommandInterface
{
    /**
     * {@inheritdoc}
     */
    final public function get_name()
    {
        return sprintf('my-plugin %s', $this->get_command_name());
    }

    // ...

    /**
     * Get the "my-plugin" command name.
     *
     * @return string
     */
    abstract protected function get_command_name();
}
Above is a way that we could handle this problem. We have the get_name method which is now final. The method now uses sprintf to format the command name.
The string starts with my-plugin command prefix. We then append the command name which comes from a new method: get_command_name. This is an abstract method that we can use now, but that concrete classes have to implement.
namespace MyPlugin\Command;

class MyCommand extends AbstractCommand
{
    // ...

    /**
     * {@inheritdoc}
     */
    protected function get_command_name()
    {
        return 'my-command';
    }
}
Here’s an example of one such concrete class. The MyCommand class extends the AbstractCommand abstract class. The get_command_name method returns my-command which will make the get_name method return my-plugin my-command.
Finishing with an example
At this point, you have everything that you need to build WP-CLI command objects. The CommandInterface interface lets us define a contract between command objects and the WP_CLI::add_command method. And then you can use a function myplugin_add_command to convert our command objects into arguments for the WP_CLI::add_command method.
Meanwhile, the AbstractCommand abstract class makes for a good base class. It streamlines a few redundant aspects of building command objects. It’s also a good place to add helper methods if you need any while building your commands.
Creating the metadata of an attachment
We’re going to wrap this up with an example command class modified from the Ymir plugin. It creates the attachment metadata for a given attachment ID. I named the class CreateAttachmentMetadataCommand and you can see it below.
namespace MyPlugin\Command

class CreateAttachmentMetadataCommand extends AbstractCommand
{
    /**
     * {@inheritdoc}
     */
    public function __invoke($arguments, $options)
    {
        $attachment = get_post($arguments[0]);

        wp_update_attachment_metadata($attachment->ID, wp_generate_attachment_metadata($attachment->ID, get_attached_file($attachment->ID));

        \WP_CLI::success(sprintf('Created metadata for attachment "%s"', $attachment->ID));
    }

    /**
     * {@inheritdoc}
     */
    public function get_description()
    {
        return 'Creates the metadata for the given attachment';
    }

    /**
     * {@inheritdoc}
     */
    public function get_synopsis()
    {
        return [
            [
                'type' => 'positional',
                'name' => 'attachment_id',
                'description' => 'The ID of the attachment',
            ],
        ];
    }

    /**
     * {@inheritdoc}
     */
    protected function get_command_name()
    {
        return 'create-attachment-metadata';
    }
}
We’re not going to look at these methods in order. To begin, we have get_command_name that returns create-attachment-metadata. This, combined with the get_name code in the AbstractCommand class, means that the full command name is my-plugin create-attachment-metadata.
Next, there’s the get_synopsis method. It lays out what the command arguments and options are for the my-plugin create-attachment-metadata command. The command is quite simple and only has one argument: attachment_id.
The last method is the __invoke method which performs the command. It uses the get_post function to get the attachment from the given attachment_id. Because attachment_id is a positional argument, we don’t fetch it with its name. We use its position in the array which is 0.
Using the attachment, we generate the metadata using the wp_generate_attachment_metadata function. The function needs the file path which we get using get_attached_file. We finish off with wp_update_attachment_metadata to update the metadata in the database.
If everything goes well, we can send a success message to the console. You can do that with the help of the \WP_CLI::success method.