Someone once asked me, “What’s the thing that used to scare you the most as a developer?” And, without even hesitating, I answered, “Linux and the command-line interface.” We both laughed at the answer.
That’s because I’m hardly the only one to think this. There are few things early in your career as a developer that you’ll dread touching more than a command-line interface. And, even later in your career, you might still try to avoid it at all costs.
That’s why there are so many developer tools that are nothing more than abstractions over the command-line. We’d rather pay and use these tools than have to deal with a command-line interface. This isn’t a bad thing per say either.
If you get the job done faster with those tools and are more comfortable with them, you should use them. But, that doesn’t mean that you shouldn’t be comfortable with a command-line interface either. There are situations (like when you’re connecting to a server) where you won’t have access to your favourite tool, but you’ll have access to a command-line interface.
What is the command-line interface?
Long ago before we had graphical user interfaces (but after the punch cards!), we had the command-line interface. The command-line interface was a powerful way to interact with a computer. You’d type commands in it, and the computer would perform the tasks defined by those commands for you.
The command-line interface was also incredibly flexible. You could chain multiple commands together (we’ll see that later) to have the computer perform more complex tasks. This allowed you to achieve almost anything with a computer.
In fact, this flexibility is one of the reasons why the command-line interface is still so popular to this day. Graphical user interfaces do not offer the same level of flexibility as the command-line interface. But they more than makeup for this with their ease of use. (Well, most of the time!)
There are multiple command-line interfaces
Now, it’s worth pointing out that every modern operating system has a command-line interface. However, all these command-line interfaces mostly fall into one of two camps: Unix-like or Microsoft. Although, as we’ll see in a second, this division into two groups isn’t quite true anymore.
Unix-like operating systems group most of the operating systems in use today. You have Linux and all its different distributions. But you also have macOS, iOS and Android. All these operating systems use a Unix command-line interface.
Meanwhile, Microsoft has two operating systems: DOS and Windows. These operating system command-line interfaces don’t have the same commands and conventions as the Unix ones. But even more important, developing software on Windows doesn’t rely on using its command-line interface. (That’s a common reason why developers like developing on it.)
That said, this all changed recently. In 2015, Microsoft added Linux compatibility layer to Windows 10. This allows you to run Unix-like commands in Windows. So the distinction that we mentioned earlier doesn’t matter as much anymore.
Focus on the Unix-like command-line interfaces
The reason to mention this is that this article will focus exclusively on Unix-like command-line interfaces. We won’t look at Microsoft or any other type of command-line interfaces. The good news is that, with the 2015 Windows update that we just discussed, you’ll be able to follow along with Windows as well.
Besides, even if this update didn’t exist, it’s still useful for you to learn about the Unix command-line interface. That’s because Linux is the preferred server operating system nowadays. So the moment that you connect to a server using SSH, you’ll have to use a Unix-like command-line interface.
It’s because of this dominance of the Linux operating system that we’re looking at this family of command-line interfaces. If you’d rather have a more authentic Linux experience with Windows, you don’t have to use its compatibility layer. Instead, you can use a virtual machine with Linux installed on it.
The terminal
Ok, so this covers what a command-line interface is and which one we’ll see in this article. Now, we want to look at how we can interact with a command-line interface. It’s all done through an application that a lot of developers call “Terminal“.
But this is just the common name for this type of application. For example, both GNOME Linux desktop enviroment and macOS call their application “Terminal”. But, the KDE Linux desktop environment and Windows call it “Console”.
The fact is that there are a lot of different terminal applications for all operating systems. And it’s not unusual for developers to use the term “console” and “terminal” interchangeably. They might even use their preferred terminal application name instead of either term as well!
This can make it confusing for you to know what someone is talking about. For the sake of clarity, the rest of this article will use “terminal” to refer to the terminal application. But feel free to use the term that you prefer outside of this article!
Opening a new terminal window
So now that we’ve clarified the terminology around the terminal application, we can open it. This will bring up a new terminal window. That’s what we call a terminal screen when you use a graphical user interface.
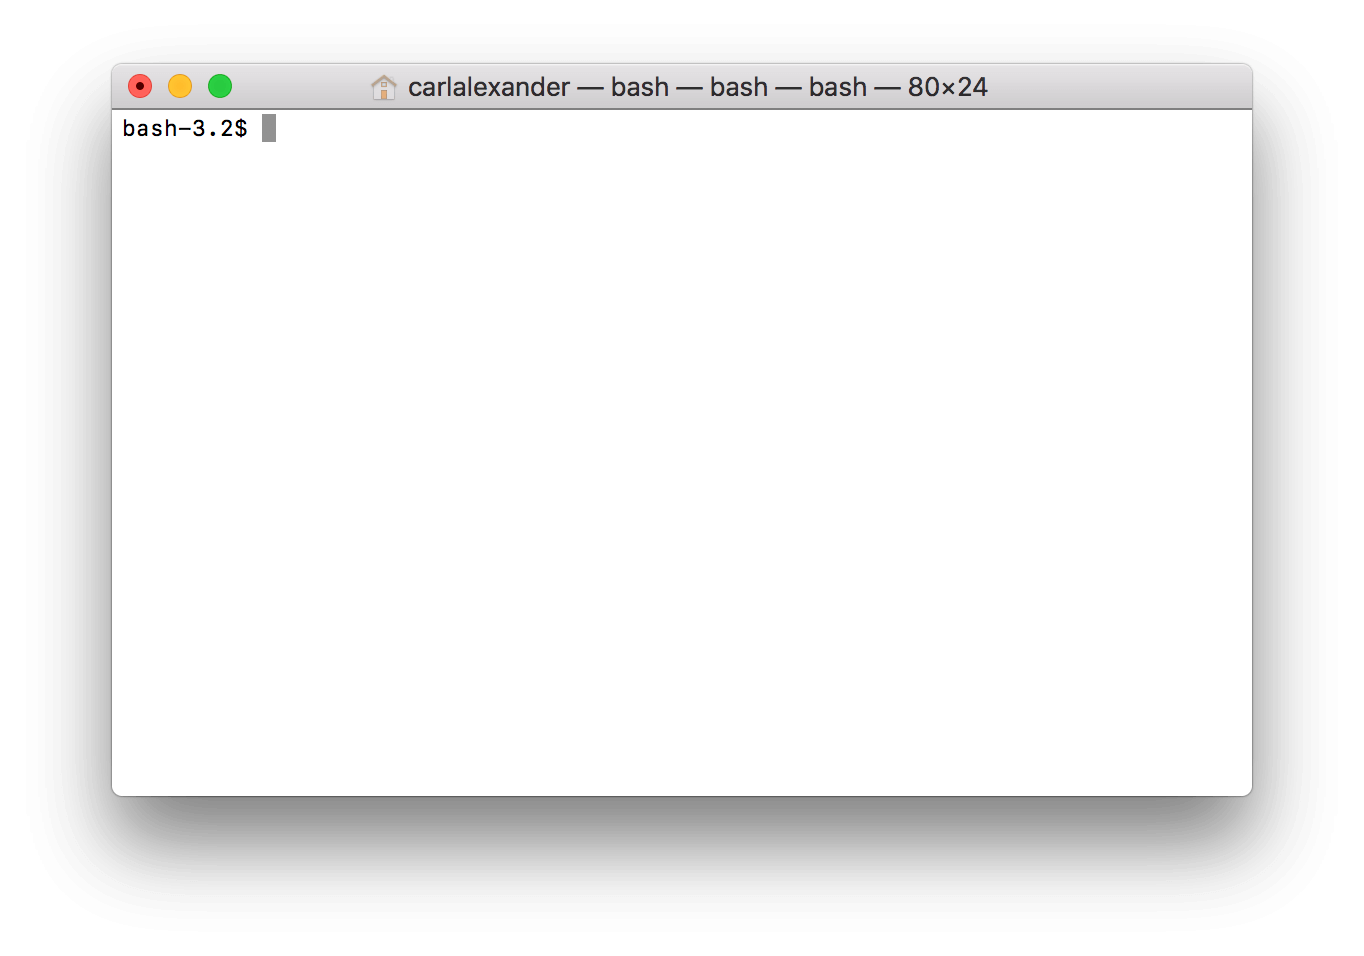
Above is what you see when you open a new terminal window in macOS. It’s a bit of a scary sight when you’re not familiar with a command-line interface. That’s because you only have some cryptic text (like bash-3.2$ in our screenshot above) and a blinking cursor on your screen.
But that cryptic text and blinking cursor are important elements of the command-line interface. The bash-3.2$ is what we call the “prompt”. You can recognize it because of the dollar sign ($). Everything before it is part of the prompt.
The prompt is important because it’s contextual information supplied by the terminal. The most common information that you’ll see in the prompt is your current directory. But you can customize it to display a wide range of contextual information.
Meanwhile, the cursor is a lot easier to understand. A lot of us have seen a cursor before. In this context, you use it to interact with the command-line interface. It tells you where you are and where characters will appear when you type them.
Typing our first command
At this point, we’re ready to type our first command into our terminal. One of the most common commands that you’ll use with a command-line interface is the ls command. The ls command is an abbreviation for “list”.
As its full name suggests, we use the ls command to list things. Specifically, we use it to list files and directories in a specific directory. Here’s an example output for a ls command.
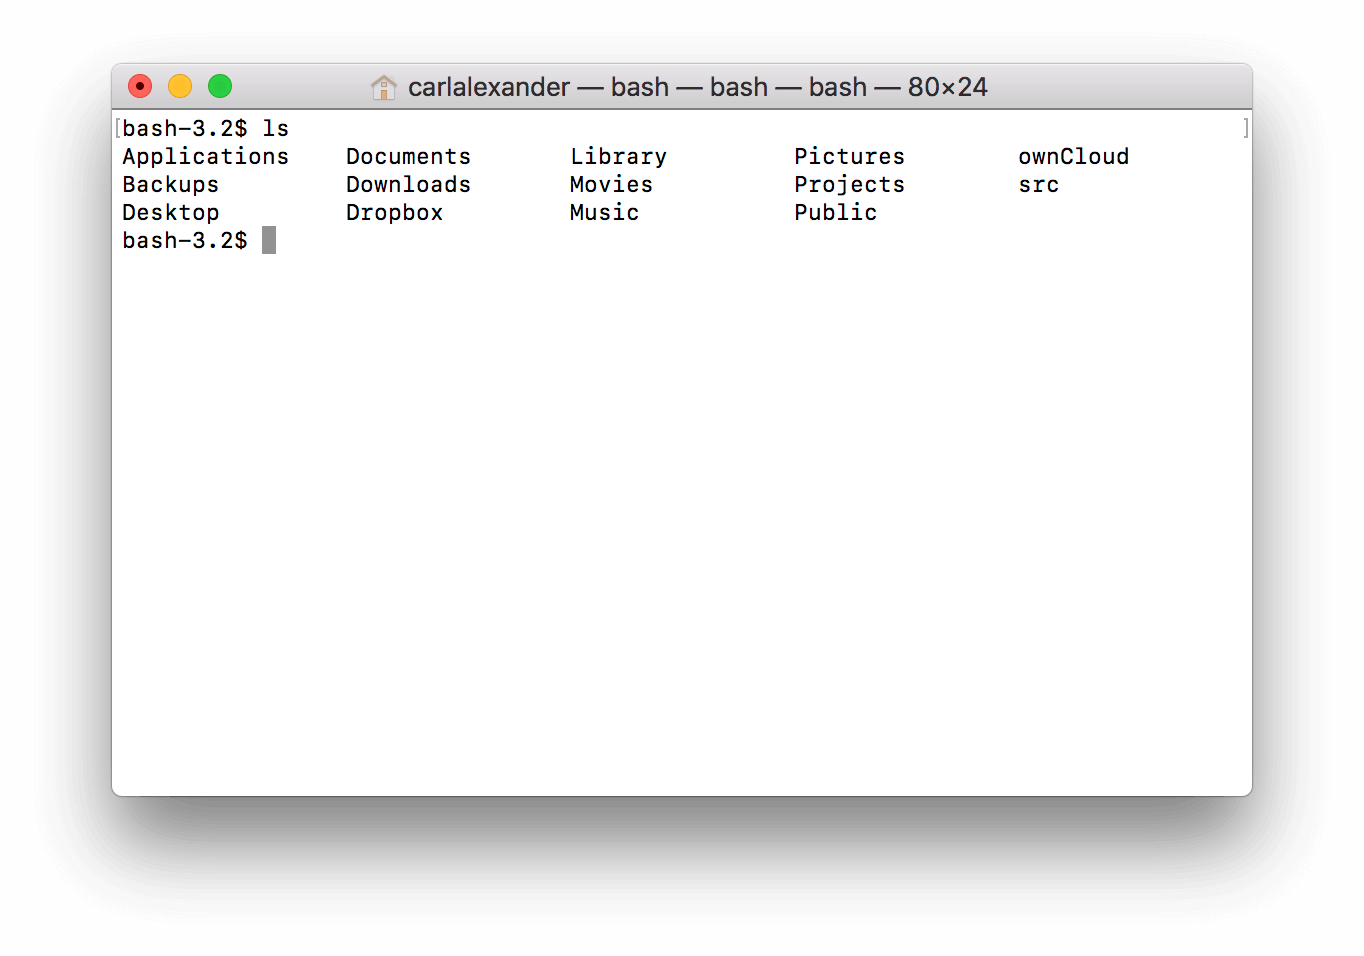
This specific ls command is listing all the folders and directories in my home directory. But how do we know that we’re in the home directory? There’s nothing to tell us that we’re there.
That’s true, and that’s one of the confusing things with the command-line interface. It doesn’t always tell you where you are. That said, in general (but not always), if you open a new terminal window, it’ll open in your home directory.
But, if you’re not sure where you are, you can use the pwd command. The pwd is an acronym for “Print working directory”. And it does exactly as the acronym says. It outputs the current directory (also known as working directory) that you’re in ito the terminal window.
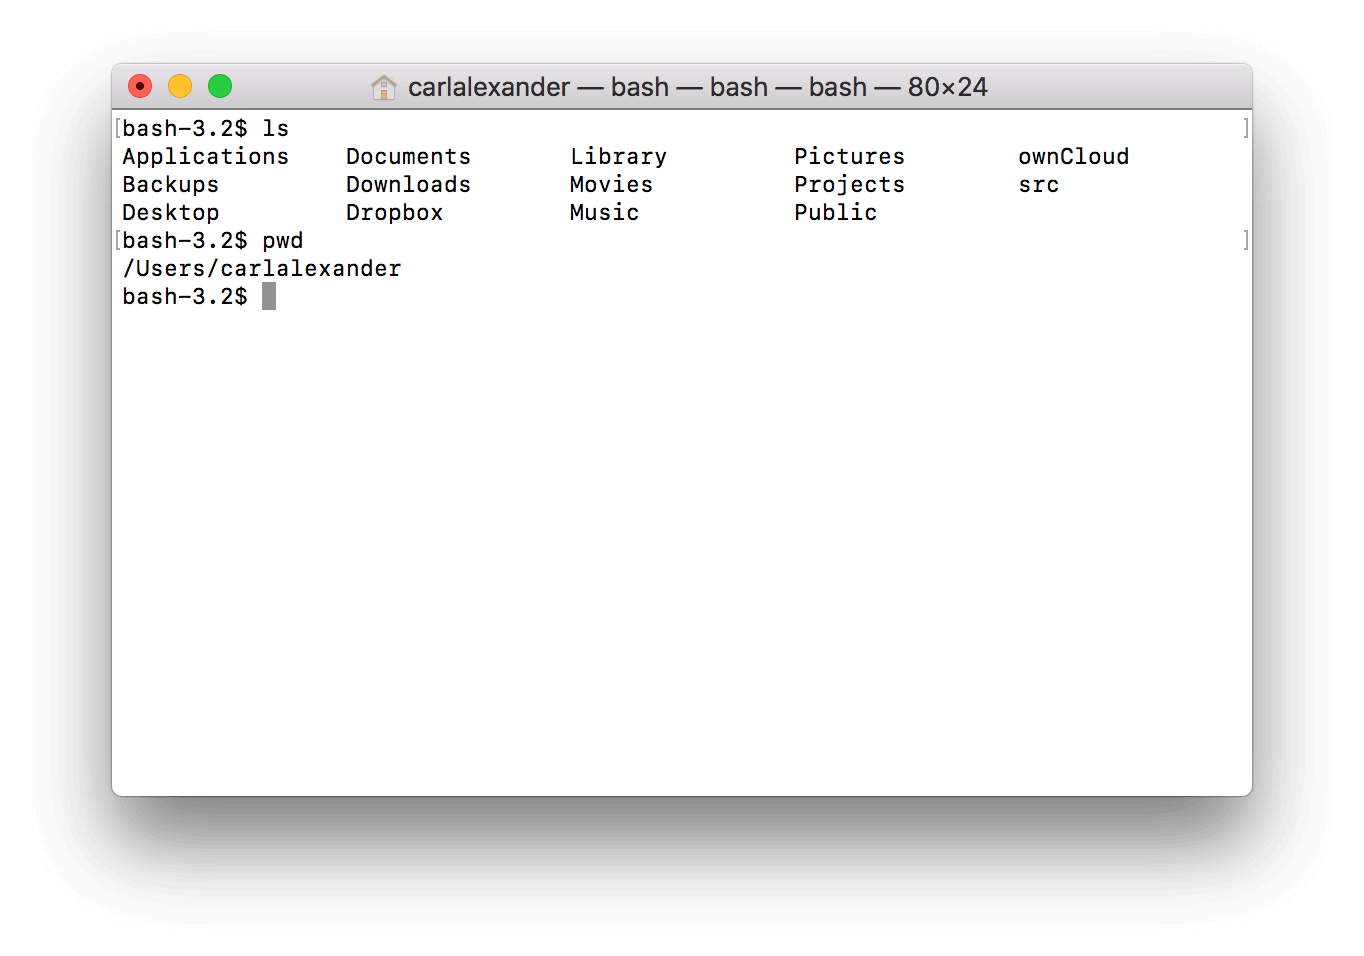
Here’s the output of the pwd command after our previous ls command. As you can see, we’re in my home directory. Now, we knew this because of the default behaviour of opening a terminal window. But if at any time you’re not sure where you are anymore, a quick pwd command will tell you.
Command options
Alright, let’s go back to our previous ls command. You might have thought that its output was a bit vague. You got a lot of names, but no other information on those names. For example, there was no easy way for you to know that all those names were directories.
Commands like ls can let us solve some of these issues using options. (You can also call them flags or switches.) An option lets you modify the default behaviour of a command. For example, you can tell the ls command to create a more detailed output like this:
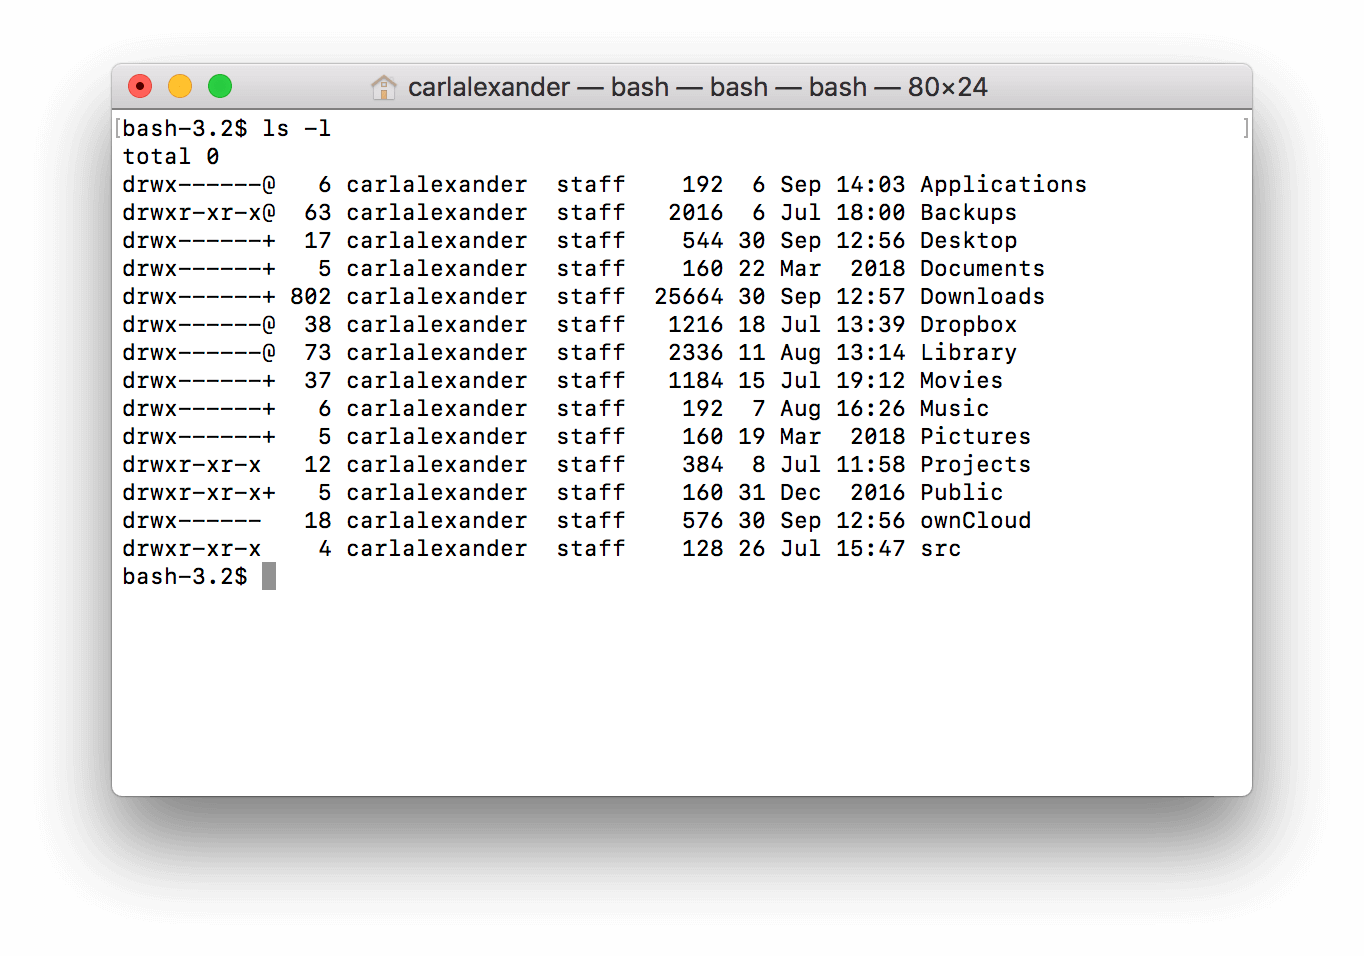
Woah, that’s a pretty different output than what we had earlier with just the ls command! The -l in the ls -l command is our command option. It tells the ls command that we want the long format output instead of the regular output that we had earlier.
Now, the goal of this article isn’t to explain the output from the ls -l command. Most of it relates to file system permissions and that’s out of scope for this article. Instead, the goal here was to show you how a simple option can drastically change the output of a command.
That said, we shouldn’t move on without explaining how we knew that every name was a directory. The d in drwx------ in the ls -l output is what tells us that something is a directory. So that’s how you can know that everything was a directory since every name in the list had a d.
man pages
You might be wondering, “How can I know what options are available to a command?” Well, that’s what the man command is for! It lets you view the man page (which stands for manual page) of a specific command.
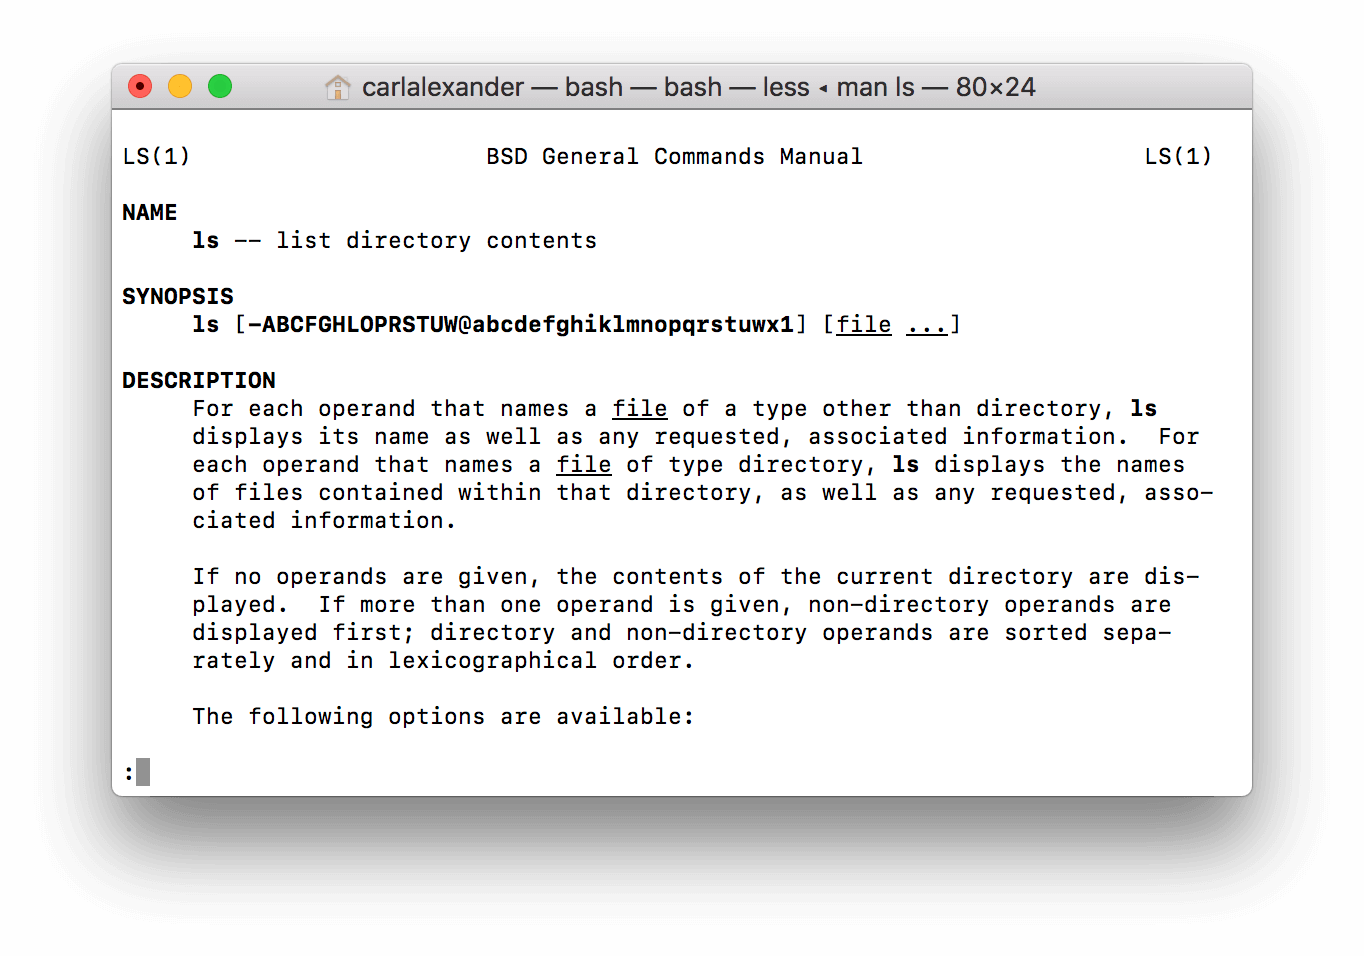
Above is the output of the top of the man page for the ls command. You can view it yourself by using the man ls command. As with a lot of things command-line related, it’s pretty overwhelming.
To easiest way navigate a man page is to use the down and up arrow key. But you can also use the space bar to scroll to the next page. (Although, next page is a bit of a deceptive term here. What it means is the entire length of your screen.) To exit the man page, all that you have to do is press the q key. (It stands for “quit”.)
Command arguments
The man command is a good way to bring up another important command element: the argument. A command argument is a piece of information that you want to give to a command. For example, with the man ls command from earlier, ls is the argument that you pass to the man command.
Funny note: man can also be an argument for the man command. So you can do man man to see the man page for the man command. So meta!
Some commands like man require that you give it an argument each time. But others, like ls, don’t. (If you don’t give it an argument, the ls command will use your current directory as an argument.) You can see whether a command always needs an argument or not when you look at a commands man page.
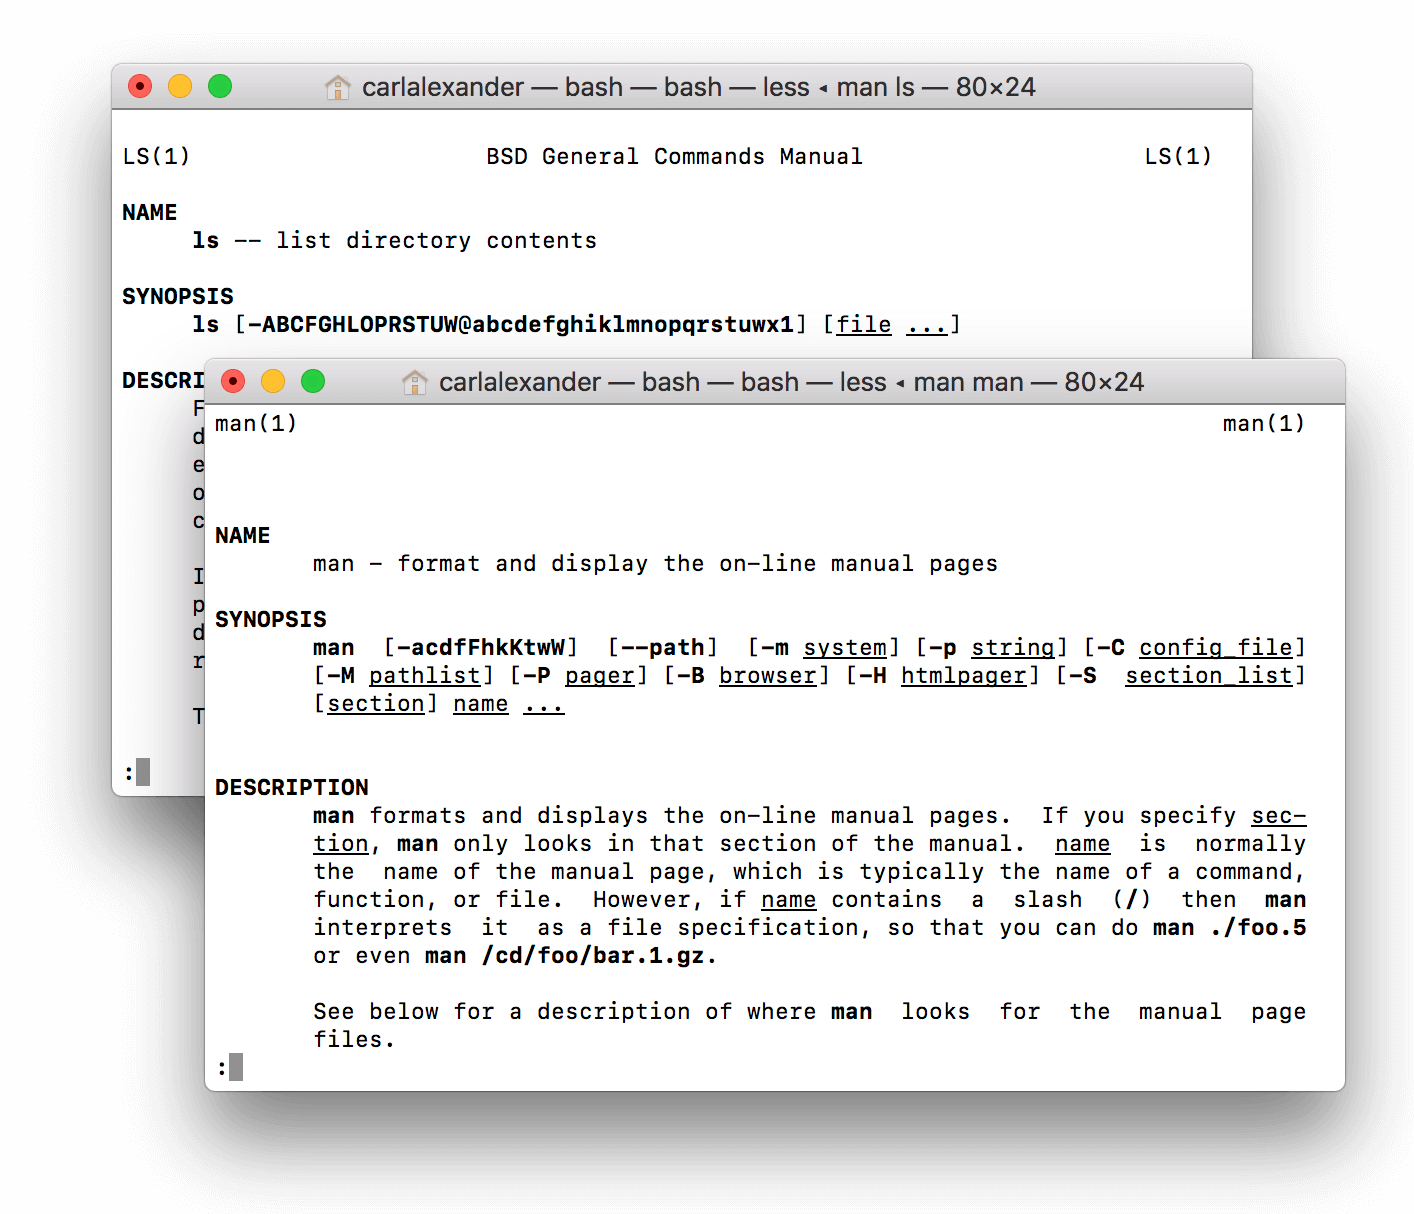
Here are the two synopsis sections of the man pages for the ls and man commands. The synopsis section of the man page shows you all the possible options for a command as well as its arguments. If you look at the end of the one for the ls command, you’ll notice that it says [file ...]. Meanwhile, the one for the man command says name without square brackets.
The square brackets are what tells you whether an argument is optional or not. If an argument is in square brackets, it’s optional. Otherwise, it’s mandatory.
You might have also noticed the ... (known as an ellipsis) next to the file. It has different meanings in different programming languages. Man pages use it to indicate that a command is variadic. A variadic command is a command that accepts a variable (thus the name!) number of arguments.
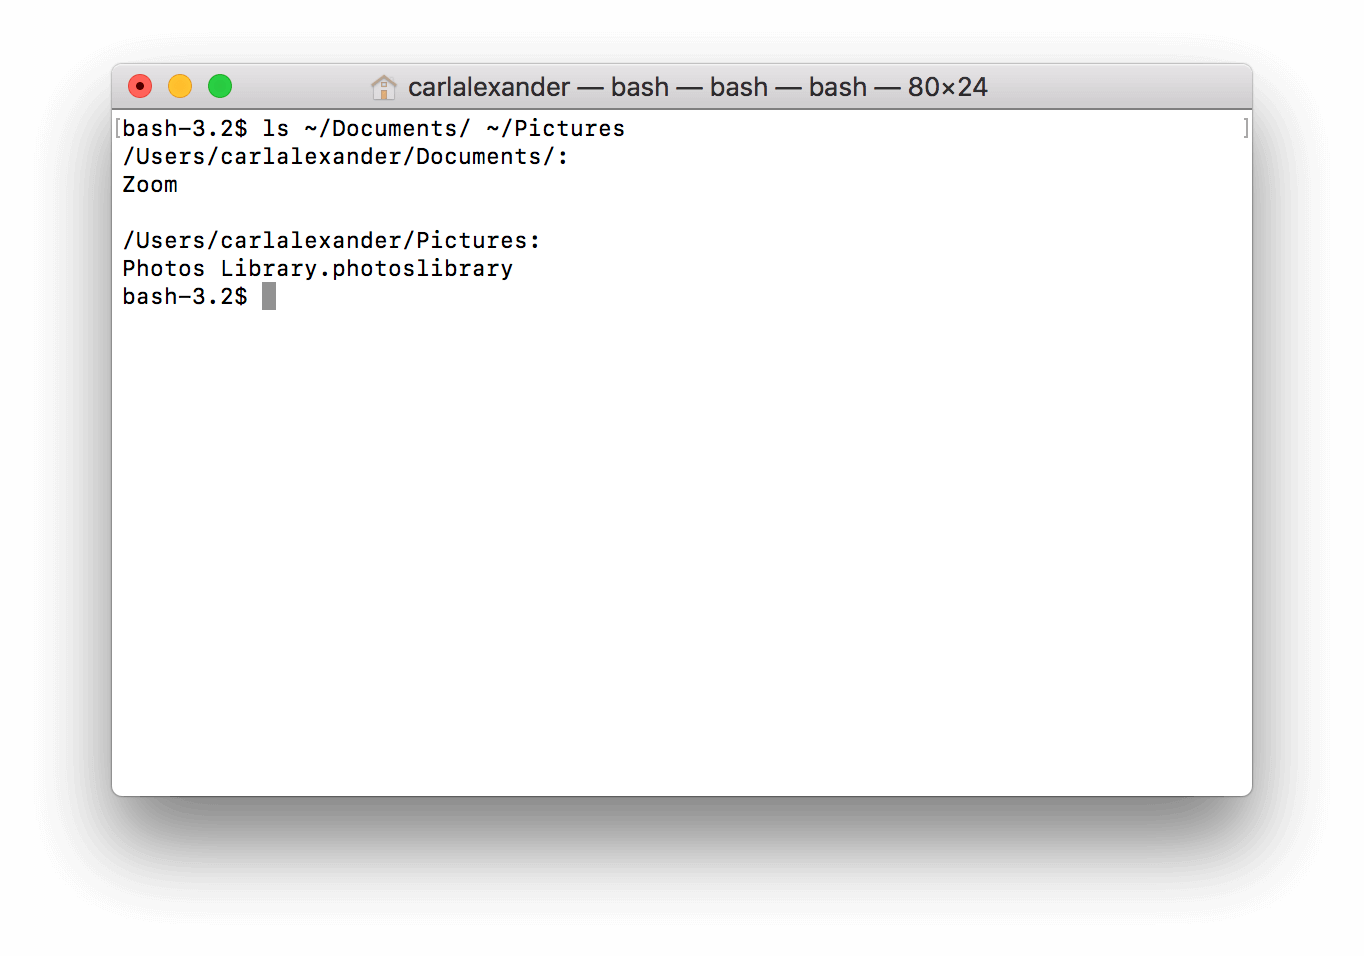
Here’s what the output of the ls command using multiple arguments looks like. It’s not that different from the output from the first ls command that we saw. The only major difference is the header indicating which directory the ls command is listing.
How do you navigate inside the command-line interface?
So far, we’ve talked a lot about commands. These commands are how you accomplish anything using a command-line interface. But we haven’t really talked about how you move around the command-line interface.
For example, what do you do if you made a typo in the command that you just typed? Well, you could just use the backspace key ⌫ to delete everything up to the typo and then type it back again. (We’ve all done this before!) But you can also use the left ← and right → arrow keys to move the cursor back and forth on the line that you’re typing.
But the most useful keys to know about are the up ↑ and down ↓ arrow keys. These two keys let you navigate through the previous commands that you’ve performed. This is super useful if you have to perform the same command over and over. Or if you don’t remember a command that you did earlier.
Let’s imagine your previous commands as a list. The up ↑ arrow key moves up that list and displays the previous commands that you’ve done going from the most recent to the oldest. Meanwhile, the down ↓ arrow key goes down the list back towards your most recent command that you’ve performed.
Searching past commands
After a while, this list of commands is going to get quite long. Navigating it using the up ↑ and down ↓ arrow keys is going to get tedious. You need a better way to find a previous command you might have typed a few hours ago or even a few months ago.
This brings us to other ways to navigate the command-line interface besides the keys that we just saw. These other navigation methods rely on combining multiple keys into a keyboard shortcut. They’ll use either the alt Alt key, the control Ctrl key or the shift ⇧ key. (If you’re on macOS, there’s also the option ⌥ key.)
In this case, the keyboard shortcut that you want to use is Ctrl + R. This keyboard shortcut will bring the search interface. You can then use it to search for commands that you’ve typed before like this:

This is what our command-line interface gives us if we use the Ctrl + R keyboard shortcut and then type “ls”. It brings us the last command that we typed that contained ls. For us, that was the variadic call with the ls command in the last section.
But this is just this is just the most recent result, what do we if this isn’t the result that we want? Well, you can keep typing to narrow the search down. But you can also reuse the Ctrl + R keyboard shortcut to bring up the next search result.
And what do you do once you’ve found the command that you were looking for? You have two options. You can press the enter ↵ key to execute the command as is.
But we don’t always want to execute our command as is. In that situation, you can press the escape ESC key instead of the enter ↵ key. This will let you edit the command instead of executing it as is.
Cancelling a command
And while we’re on the topic of keyboard shortcuts, we should talk about the most important one of all! It’s Ctrl + C. This is the shortcut used to cancel the command that’s currently running.
Now, it’s normal to make mistakes. The problem is that mistakes with a command-line interface can land you in a lot of trouble. When that happens, the command-line interface will either hang or, at least, won’t let you enter any new commands.
This is why Ctrl + C is such an important situation. It’s your “Get out of jail” card when you get yourself in any sort of trouble. And, if Ctrl + C doesn’t work, pressing the ESC key will work most of the time.
Moving your cursor around
Ctrl + R and Ctrl + C are the two most important keyboard shortcuts to know. But there are a lot more than just those two. For example, there are a lot of keyboard shortcuts to move your cursor around.
You can move your cursor to the beginning of a line by doing Ctrl + A. And then, to go back to the end of the line, you can do Ctrl + E. If you’d rather scrap the entire line that you just wrote, you can do Ctrl + U.
But these keyboard shortcuts can be a bit rough if you’re trying to modify the middle of a command. You have to either go back multiple times using the left ← arrow key. Or you have to move to the beginning of a line using Ctrl + A and then move forward using the right → arrow key.
For situations like these, you can use Ctrl + ← and Ctrl + →. These two keyboard shortcuts let you move between the arguments and options of your command. This one of the most useful keyboard shortcuts for making quick changes to a command that you typed.
Command-line completion
Up until now, we’ve worked under a pretty big assumption. It’s that you always know what command to type in the command-line interface. Or even, if you know what command to type, you might not know how to spell it.
But that’s not going to be true most of the time when you’re starting off. And even advanced command-line interface users don’t always remember what command to type or how to spell it exactly. That’s one of the reasons why command-line interfaces have command-line completion.
Command-line completion is one of the most useful features of command-line interfaces. It lets the command-line interface autocomplete part of a command for you. All that you have to do is start typing part of your command and then press the tab ⇥ key.
This feature of command-line interfaces is especially useful if you’re trying to write a file or directory name. These names can be long and tedious to write. It’s also easy to make a typo while writing them.

Above is an example of a command-line completion with directory names using the ls command. Typing ls De⇥ causes the command-line interface to complete the command as ls Desktop/. But what happens if there’s more than one result for a command-line completion?

Well, this is what you get if you type ls D⇥ instead of ls De⇥. Since there are multiple directories that start with the letter D, the command-line interface can’t complete the directory name. Instead, it lists them all and makes you retype your command. (It’s also possible for command-line interfaces to let you choose which directory name to use for completion instead.)
Things I wish I knew when I started using a command-line interface
This covers the basics of the command-line interface. Now, we didn’t cover that many commands in this article. This might feel a bit disappointing to you, but you really shouldn’t feel that way.
These are all things I wish I’d known when I started using command-line interfaces. It’s a solid foundation of knowledge to help you feel more at ease with them. That’s more important than looking at a subset of commands that you can use.
That’s because there are so many commands. Whatever commands you see in an article will only be a small subset of all the commands that you have at your disposal. That’s why we’ll leave those for future articles.
In the meantime, if you’re looking for more, I suggest taking a look at this zine by the very talented Julia Evans. It’ll teach you about some of the most popular and powerful commands in a non-intimidating way. It’s not free, but you can read more about it here.
Photo Credit: Sai Kiran Anagani

