
In 2016, I wrote a guide on how I setup my new MacBook Pro. I found it useful to have some documentation on how I set up my work environment. It’s also an opportunity for me to review the tools that I use and my overall workflow.
Well, the time has come for me to do it again! I just got a new 14 inch MacBook Pro with a M1 Pro processor and 32GB of memory. I had a lot of anxiety trying to get the right spec for the laptop to have good performance, but also good battery life. I hope I picked correctly!
Because I already wrote a guide for the 2016 laptop, this guide will be a bit different. I’m generally happy with my workflow still, so some sections will be copied over and maybe edited slightly.
It’s also worth pointing out that this is going to be macOS centric. This is becoming less of an issue over time as more and more of us work with Apple laptops. But it’s still worth mentioning because some application recommendations are going to be for macOS applications.
I’ll also discuss why I picked some of these applications. I think it’s useful to know why I picked a tool and which ones I tried. What might be a good fit for me might not be for you.
With that out of the way, let’s begin setting up this new MacBook Pro!
Run software updates
Once I go through the Apple setup wizard, the first thing that I do is run system updates. (Yep, you heard that right!) I click that Apple icon in the upper left and go to Software Update. Normally, this takes a little while, but there weren’t any updates this time!
System preferences
After I’m done with software updates (or while they’re running), I take care of the other boring stuff as well. This means opening System Preferences and going through all the options. I change them to match my personal preferences.
What defines my workspace is that almost every application that I use is full-screen. I do this to reduce distractions as much as possible. (If you haven’t met me, I’m pretty hyperactive! This helps me a lot.)
Dock
The dock is the first thing that I customize. It really sticks out when I log in the first time and I see all these dock icons I don’t care about! So I remove most of them.
I also like to configure my dock so it distracts me as little as possible. I do the obvious stuff like shrink it and hide it. I also disable badges on most applications.
A more interesting decision is moving the dock to the right. I can’t remember what prompted me to do it. But, for me, it removed a subtle source of distraction.
In older versions, macOS didn’t do a perfect window fullscreen. There was always a gap to show where the dock was. When the dock was on the left, I’d look at it a lot because I noticed the gap a lot since a lot of applications are left heavy. (Navigation and such are always on the left.)
There’s no more gap in the newer macOS versions. That said, having it on the right is still useful. That’s because I’m less likely to mouse over it compared to if it was at the bottom or left of the screen.
I also like locking the size of the dock. I found on StackOverflow that there’s a command you can run to do that:
$ defaults write com.apple.dock size-immutable -bool no && killall Dock
Mission control
I also don’t use external monitors. Instead, I rely on mission control to give each application a dedicated space. I’ve been using six spaces for almost a decade. In order, they contain:
- Communication applications (e.g. Discord, Slack, iMessage)
- Specialized applications (e.g. SourceTree, TablePlus)
- Text editor
- Browser
- IDE
- Terminal
I navigate between each space using track pad gestures. For this to work well, I need to disable auto rearranging of spaces so that everything stays in order. I find this quicker than turning my head to look at an external monitor. Another bonus is that I can use this when I’m not working from home. (This happened a lot before COVID.)
Installing homebrew
Homebrew is the primary package manager for macOS. I use it to install most of the tools and applications that I use every day. Without it, it would be a lot more complicated and time-consuming to set all this up.
Installing homebrew is pretty easy. You only need to run the command below. This will run you through the installation process.
/bin/bash -c "$(curl -fsSL https://raw.githubusercontent.com/Homebrew/install/HEAD/install.sh)"
Once homebrew installed, I do a last check to see that everything is ok. Homebrew has a handy diagnostic command you can use to do this.
$ brew doctor
If there are any issues, I fix them right away. But, before we proceed, I want to go over these two homebrew commands:
$ brew install
$ brew install --cask
I’ll be using these commands a lot to install packages and applications. brew install is the main command for installing anything with homebrew. brew install --cask uses the --cask option to specify that we want to install a cask which is a macOS application like Chrome.
Keyboard layout
Once homebrew installed, I want to install a custom Canadian French keyboard layout. I know that I’m more of an anglophone now, but I’ve been typing on that layout since I’m a kid. Apple doesn’t support that layout by default so I install a custom made one from GitHub. (I’m not interested in learning a new layout.)
I ran into issues with the custom layout reverting. I managed to fix it because of this StackOverflow answer. I ran this command and rebooted:
sudo mv ~/Library/Keyboard\ Layouts/* /Library/Keyboard\ Layouts
Terminal
Now that we’ve taken care of all the housekeeping stuff, we can move on to more interesting stuff! I spend a lot of time in terminal because I do a lot of sysadmin work. So that’s the next thing that I setup and configure.
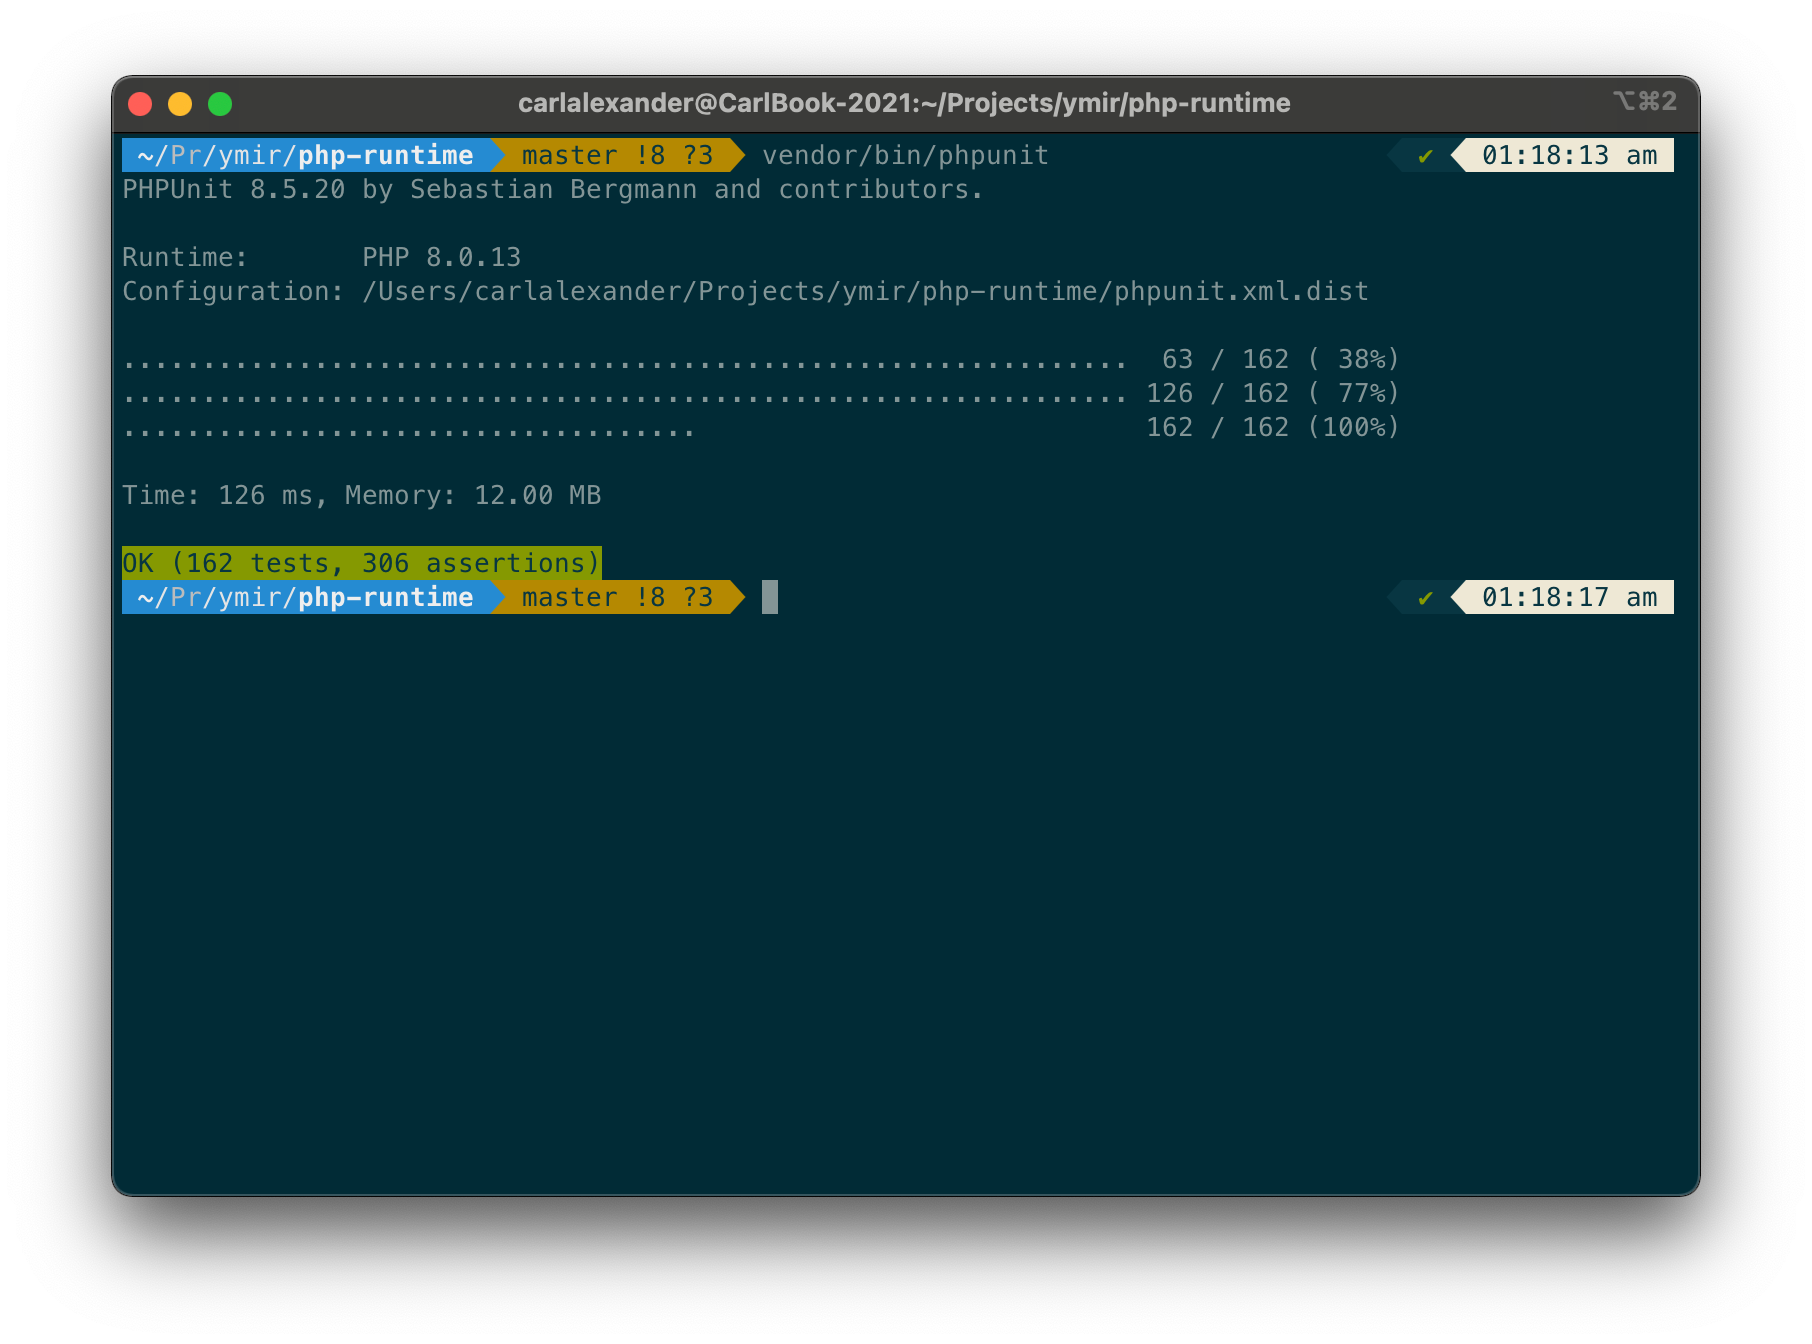
This is what my terminal looks like after I’m done setting it up. This guide helped me set it up the first time. I’m still going to go through it and explain what I like about the setup.
iTerm2
The first thing worth noting is that I don’t use the default macOS terminal application. Instead, I use iTerm2. I install it using homebrew:
$ brew install --cask iterm2
For most developers, there isn’t much of a reason to switch. The key feature that I need from iTerm2 is split panes. I find it more useful than using screen for sysadmin work.
I also change the default terminal colours. I’m a big fan of the solarized colour palette. iTerm2 comes with a solarized colour palette, so I switch to the Solarized Dark color preset. (This is going to be a recurring configuration change with a lot of my applications.)
Zsh
I also don’t use bash as my command line shell. I replaced it with zsh. I install it (via homebrew) with some extra auto-completion definitions:
$ brew install zsh zsh-completions
Oh My Zsh
Oh My Zsh is a bundle of functions, plugins and themes for zsh. It’s the reason why I use zsh instead of bash. It turns your shell into a tool that feels like it’s working with you instead of against you.
In fact, it’s pretty hard to go back after you’ve used it for a while. That’s why it’s one of the first things that I install. I do it by running this command:
$ sh -c "$(curl -fsSL https://raw.githubusercontent.com/robbyrussell/oh-my-zsh/master/tools/install.sh)"
Powerline theme
Once zsh installed, I install the powerline10k theme. I like the theme a lot because it gives me a lot of useful information at a glance. It’s not available by default, so you have to clone it from the GitHub repository:
$ git clone https://github.com/romkatv/powerlevel10k.git $ZSH_CUSTOM/themes/powerlevel10k
The theme uses powerline which is a status line plugin for vim. It also works with zsh which is why the theme uses it. (I don’t use vim. gasp) It’s what allows it to show us git repository details next to the directory indicator.
Once the theme installed, we have to configure zsh to use it. To do that, I edit the ~/.zshrc configuration file.
ZSH_THEME="powerlevel10k/powerlevel10k"
The ZSH_THEME variable controls the theme that zsh will use. I change it to powerlevel10k/powerlevel10k. This enables the powerline theme that I just installed. I save the change and then restart iTerm.
This will start the powerline10k theme installation wizard. It’ll download the powerline font. It’ll also walk through a lot of configuration options. Before, you’d have to do this all yourself. So this is a huge improvement!
Configuring zsh plugins
Next, I want to choose which Oh My Zsh plugins I want zsh to load. By default, Oh My Zsh only enables the git plugin. Here are the ones that I use right now:
plugins=(git brew colored-man-pages composer npm pip symfony2 wp-cli)
There isn’t anything too special on that list. Most of those plugins offer auto-completion and aliases for CLI tools I use regularly. I also use two other plugins that I install with homebrew:
$ brew install zsh-autosuggestions zsh-syntax-highlighting
zsh-autosuggestions lets zsh suggests ways to autocomplete commands based on your command history. zsh-syntax-highlighting does syntax highlighting in the zsh shell. Autosuggestion is especially handy and I recommend it to anyone who works a lot with command-line.
Security
Once I’m done configuring my terminal, I move on to security. This is often a neglected thing by developers. (That includes yours truly.) I’m trying to be better about it and privacy, but it’s an uphill battle. (This page gives you a sense of the magnitude of the endeavour.)
Password Manager
These days, it’s hard to go a week without hearing about a password leak. I think that it’s just flat out irresponsible to not use a password manager at this point. So I have to install mine before I start needing passwords. (Which is pretty much right away.)
$ brew install --cask 1password keepassxc
I mainly use 1password personally. But also use KeePassXC with some consulting clients. It’s a good option if you want something self-hosted, but I’d probably look at Bitwarden if I was looking for an open-source password manager. There’s also LastPass, but I’m not a fan based on my previous experiences.
SSH
If you’re a developer, you should be using SSH for some things that you do. For me, none of my servers uses password authentication, so I need SSH for that. This means that I need an SSH key on my computer.
I keep my SSH keys in my 1password vault. (I think this secure enough.) So I just reinstalled them on the new laptop.
Now, the default behaviour with SSH is to ask you for this passphrase every time you use your SSH key. That’s not something that I want to do when I’m using a strong password. That’s why I use ssh-agent to store the password.
ssh-agent comes pre-installed on macOS, but you still need to configure SSH to use ssh-agent. This process has changed since macOS 10.2.2. For ssh-agent to take over, you need to edit your ~/.ssh/config file:
Host *
  AddKeysToAgent yes
  UseKeychain yes
  ServerAliveInterval 60
AddKeysToAgent tells SSH to use ssh-agent for all SSH keys. UseKeychain gives permission to macOS to store all passphrases in Keychain. ServerAliveInterval is a setting that I use to help prevent my SSH connections from timing out. This isn’t a problem if you don’t work on servers much.
Git
Once I’m done configuring SSH, I proceed with installing and configuring git. This is the preferred version control system for web developers. By default, it comes already installed on macOS. But I want it managed by homebrew so I install it again:
$ brew install git
Global configuration
Next, I want to tweak my git global configuration. I start with the standard name and email. This is a useful step if you want to use Bitbucket, GitHub or GitLab. (Those are the three primary git repository hosting services.)
$ git config --global user.name "Carl Alexander"
$ git config --global user.email "my_email@example.com"
I also want to create a global ignore file. This lets me define files and directories that I want to ignore for all my projects. To do that, I follow this guide from GitHub.
$ vi ~/.gitignore_global
I start by creating a .gitignore_global file in my home directory. I put the following in it:
# compiled source #
###################
*.com
*.class
*.dll
*.exe
*.o
*.so

# Packages #
############
# it's better to unpack these files and commit the raw source
# git has its own built in compression methods
*.7z
*.dmg
*.gz
*.iso
*.jar
*.rar
*.tar
*.zip

# Logs and databases #
######################
*.log
*.sql
*.sqlite

# OS generated files #
######################
.DS_Store
.DS_Store?
._*
.Spotlight-V100
.Trashes
ehthumbs.db
Thumbs.db

# IDE files #
#############
/.idea
*.sublime-project
*.sublime-workspace
This is a modified version of this gist. I added the IDE section at the end which contains IDE and text editor files and directories. You should never commit those to a project.
Once I saved my .gitignore_global file, I added to the git global exclude files. I do it by running this command:
$ git config --global core.excludesfile ~/.gitignore_global
Desktop client
I use git with a desktop client when I’m working on my computer. (I use the standard git CLI when I’m working on a server.) I’ve used Tower in the past, but I switched to SourceTree and never looked back. That said, SourceTree still doesn’t have Apple Silicon support so I’m trying a new client in the meantime: Fork
$ brew install --cask fork
GPG signing
I sign most of my commits with a GPG. This is as good a time as any to talk about generating a proper GPG key. Have you ever looked into it? No? (I admit this was more of a rhetorical question lol) Well, it’s a special kind of hell.
They recommend you use an offline machine to generate a master key. You then use that master key to generate subkeys for each of your computers. You also need to create revocation certificates in case your master key gets lost or stolen.
Let’s just say I wasn’t down for that much work to sign my git commits. Lucky for me (and you!), there’s keybase.io. It’s a service that reduces the complexity of generating GPG keys. Normally, you can install it with homebrew:
$ brew install --cask keybase
But it didn’t work when I was setting it up. There was an issue with Apple Silicon. So I installed it myself. (Like a peasant!)
If you’re interested in using keybase with GitHub, you can look at this handy little guide. It’ll walk you through the steps of setting everything up. It’s pretty painless overall.
Since I’d already gone through the setup before, the process was a bit different for me. I just needed to log into keybase and add the new MacBook as a device. Once I’d done that, I could import my keys.
$ keybase login
$ keybase device add
$ keybase pgp export | gpg --import
$ keybase pgp export --secret | gpg --allow-secret-key-import --import
Browser
Of course, you can’t develop for the web without a browser. Since I last wrote this guide, I switched to Firefox as my primary browser. I still use Chrome for some things, but trying to rely on less Google services.
$ brew install --cask firefox google-chrome
Extensions
I use extensions with Chrome and Firefox. There’s quite a bit of overlap between both browsers, but some are exclusive to Firefox. In general, I’ve reduced the use of extensions because there’s been a lot of security issues with them in the last few years.
Here are the ones I use across browsers:
- 1password to integrate the 1password application with the browser
- axe DevTools for accessibility testing and auditing
- HTTPS Everywhere to ensure that I’m always using HTTPS whenever possible
- ProWriting Aid is the spell checker I use instead of Grammarly
- uBlock Origin as a free, open-source ad blocker
For Firefox, I also use:
- Auto Tab Discard because I’m a browser tab fiend lol
- Facebook Container
- Firefox Multi-Account Containers
- Impulse Blocker to block sites like Twitter or Facebook so that I don’t get distracted
The two extensions are Firefox container extensions. I think is one of Firefox’s killer features. Containers protect you from Facebook tracking wherever you go. But they’re also handy when dealing with multiple accounts on the same platform. For example, I can use them to log in to two different AWS accounts.
Developer tools
So, at this point, I’m ready to install all the developer tools I use. As you’ll see, there’s nothing too surprising in there. It’s based on my personal preferences.
PhpStorm
My IDE for the last few years has been PhpStorm. I’m still super satisfied with it. (I haven’t looked at other IDEs since I switched.) It has all the features that I want out of an IDE, including WordPress integration. It also integrates a lot of the PHP tools I use regularly. (More on those later when I go over my PHP environment!)
Even though PhpStorm isn’t free, it has a free trial if you want to check it out. I manage PhpStorm through the JetBrains Toolbox. So that’s what I install with homebrew:
$ brew install --cask jetbrains-toolbox
Colours
The most important change to my IDE is the colour palette. This is another application where I use a solarized theme. (Who would have guessed!?) Mine is a customized version of this intellij solarized colour scheme. There’s also a solarized plugin if you want to style the whole IDE.
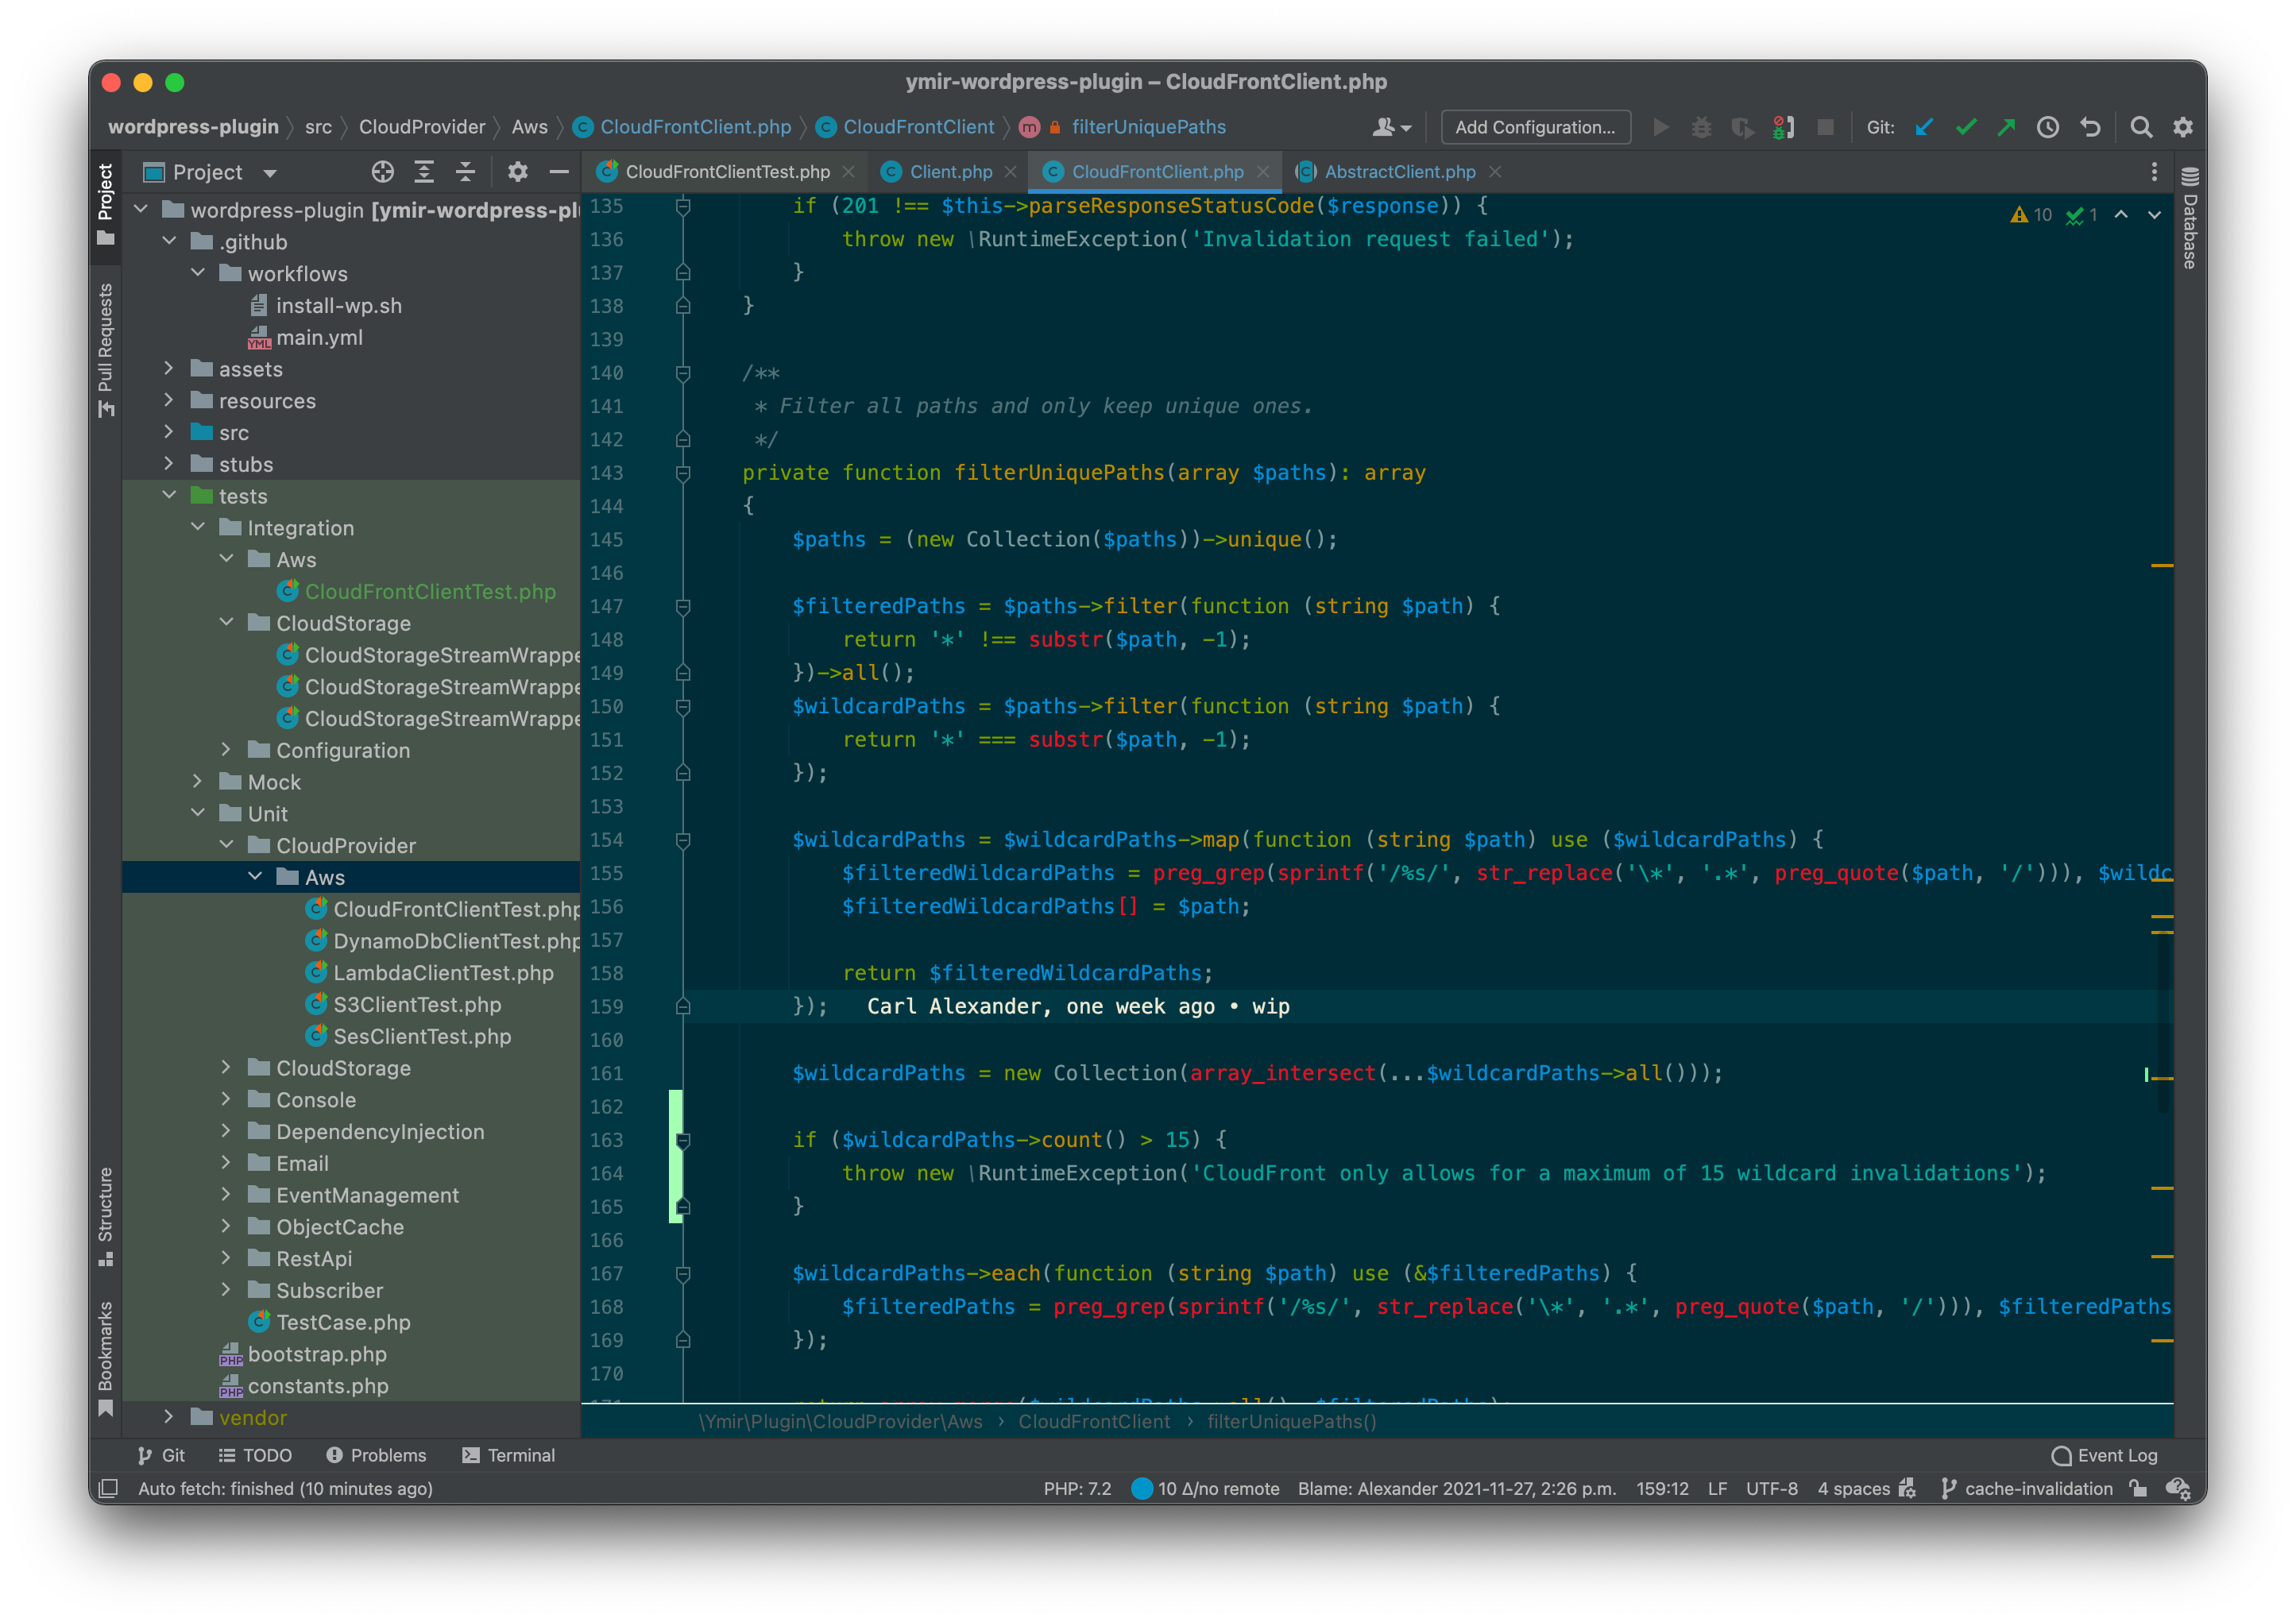
This is what it looks like at the moment. There are too many changes to go over each of them. But, if you’d like to try it out, I’ve uploaded a copy here. (The theme is Solarized Dark (New Carl). Don’t judge my naming!)
Visual Studio code
I use Visual Studio Code as my main text editor. It’s replaced Sublime Text for that role. So it’s what I install now:
$ brew install --cask visual-studio-code
I know a lot of people who use it as an IDE, but I’m still not interested in trying it out. (I was tempted recently though because of this course!) And because I use it as a text editor, I don’t have any extensions installed.
TablePlus
Sequel Pro was my go-to database management application ever since I started on macOS. Sequel Pro is a free open source application, but it’s unmaintained and unusable at this point. And while there’s a fork of it called Sequel Ace, I decided to give TablePlus
$ brew install --cask tableplus
TablePlus ended up surpassing my expectations. It supports most popular database server such as MySQL and PostgreSQL. It also has a lot of really useful features. My favourite is safe mode which lets me feel safer than I won’t do a mistake on a production database.
Paw
Another tool I use somewhat regularly is Paw. Paw is an HTTP client for macOS whose primary purpose is to help you work with APIs. With the growing popularity of headless WordPress, having a solid API tool is more important than ever.
$ brew install --cask paw
You can use Paw to test API calls to the custom WordPress REST API endpoint that you’re building. Or you can use it to check what’s returned by an existing WordPress REST API endpoint. It’s also useful if you’re developing code that makes use of another API.
The only thing about Paw is that it’s not free. (It also has a 30 day trial like PhpStorm.) It’s worth the investment if you work with APIs a lot. That said, if you don’t work with them a lot or you’re looking for something free, you should check out Insomnia or Postman. They’re great alternatives.
Docker
Docker is a tool that I use reluctantly. It’s necessary for my work on Ymir. So that’s why I install it.
$ brew install --cask docker
Tuple
Tuple is a new application I started using this year with Ymir. It’s a pair programming application, but I use it to do support. It has, hands down, the best screen sharing of any communication application out there.
$ brew install --cask tuple
If you don’t do a lot of screen sharing or don’t want to do pair programming, I’d skip it. But otherwise, I’d really look into it. It’s really excellent.
Transmit
Transmit is the FTP client I’ve settled on after trying some of the free ones. It’s just such a great product. Much like TablePlus, it’s worth it if you can spare the money.
$ brew install --cask transmit
Otherwise, I’d look at Cyberduck as an open source version. I liked it better than FileZilla.
Local development environment
Next, I want to set up my local development environment. There are few things that I need for that.
Composer
The first tool that I install is composer. If you don’t know what composer is, it’s a dependency manager for PHP. It lets you manage external libraries that your PHP project needs.
$ brew install composer
It’s pretty much the most important change to the PHP ecosystem in the last decade. You won’t see it used as much in the WordPress world. That said, it’s a mandatory tool if you do any PHP work outside WordPress which is a lot of what I do with Ymir.
WP-CLI
WP-CLI is the WordPress command line tool. It lets you perform a wide range of operations on your WordPress site without having to use a browser. It’s a bit like the composer of the WordPress ecosystem.
$ brew install wp-cli
Now, if you weren’t using WP-CLI already, it might not be worth it for you to install. I find it can be handy in a lot of situations. (It’s indispensable for me when I’m working on a server.) But the reality is that it depends on you using it in your workflow. If you don’t think you’ll use it, you don’t have to install it.
Valet
I’ve been a huge fan of Valet ever since I set it up for the first time. It’s the perfect minimalist local development environment for me. I’ve never looked back since I started using it.
$ composer global require laravel/valet
$ valet install
So why do I like it so much?
Virtualized development environments like VVV are heavy and resource intensive. Virtual box is a resource hog unless you spend time tuning it. The same goes for Docker with tools like Local or Lando.
Reluctantly, I still have to use Docker for Ymir. But I really don’t care to use it for my local development environment. It’s just too resource intensive
With Valet, I get most of the benefits of these tools without all the bloat. I can manage as many sites as I want. You can publicly share them too. It generates SSL certificates if you need them. It supports all the project types that I work with. (Laravel, Symfony, WordPress, etc.)
Database server
Valet doesn’t install a database server for you and it’s pretty hard to work without one! For WordPress, you need either MySQL or MariaDB which is a drop-in replacement for MySQL. I use the latter, which is now the version supported by the original MySQL team.
$ brew install mariadb
$ brew services start mariadb
brew services start mariadb ensures that MariaDB always starts when you reboot your computer. You can skip it if you don’t want that.
Redis
Caching is a hard problem to work on. For that reason, I want my development environment to include a caching system. That way I can work on it without relying on my production environment.
$ brew install redis
$ brew services start redis
My preferred caching system is Redis. It’s an in-memory data structure store like memcached. I prefer Redis because it can do everything Memcached can do and more. I also find it easier to use than Memcached.
To install the PHP redis extension, you then need to run:
$ pecl install redis
Ansible
I also work with Ansible a lot. It’s a configuration management tool that I use to configure servers for some of my consulting work. I install it using the installation instructions from my discontinued server configuration project wiki.
$ brew install python
$ pip3 install ansible debops passlib pycrypto future netaddr
$ debops-update
What about JavaScript?
I haven’t talked a lot about JavaScript. That’s because JavaScript isn’t a huge part of my workflow. I still install node.js for npm.
$ brew install node
But, besides that, I don’t install anything else.
Remaining applications
We’re almost done now! The only thing left to is to install the remaining applications. I’ve broken them down into some categories.
Backups
I don’t use time capsules for backups. It made little sense when I was travelling before COVID. I could be months away without being able to back up my computer. So instead, I use Backblaze.
$ brew install --cask backblaze
I don’t have a specific reason for using them. Someone recommended them to me and it’s pretty cheap. $7/month to not have to worry about losing anything on my laptop is pretty great!
Communication
Nowadays, almost everyone is on at least some chat application. I use two: Discord and Slack. But if you’re in a Microsoft environment, you probably use Teams.
$ brew install --cask discord
$ brew install --cask slack
$ brew install --cask zoom
Last, there’s the obvious Zoom. This one is also pretty much part of our daily lives now with COVID.
File sharing
The two file sharing applications I use are Dropbox and Nextcloud. Personally, I mostly use Dropbox. But I have to use Nextcloud for some of the consulting work that I’m doing.
$ brew install --cask dropbox
$ brew install --cask nextcloud
Image editing
I don’t do enough image editing to warrant paying for Adobe Creative Cloud. But I still do some enough that I need applications for it. I use GIMP and Inkscape to replace Photoshop and Illustrator.
$ brew install --cask gimp
$ brew install --cask inkscape
Video editing
Ever since I worked on my book, I’ve been doing a decent amount of video editing. I also do a lot of videos for Ymir. So I invested in a video editing tool.
$ brew install --cask screenflow
I’d done a bunch of research and settled on Screenflow. It’s still pretty expensive. But it seems like the best option for those looking for a powerful editor that isn’t super intimidating to use.
Miscellaneous
Last is a bunch of miscellaneous applications that didn’t fit in a category.
$ brew install --cask cleanshot
The first one is Cleanshot. Cleanshot is a screenshot taking and video capturing tool. It seems absurd to pay for something macOS does natively, but it’s really that good.
$ brew install --cask flux
Flux is adjusts the colours of your screen depending on the time of day. I’ve used it for years before night mode became a thing. I still think it does it better than the macOS native night mode.
$ brew install --cask rectangle
Rectangle is a great little application. It lets you manage your application windows with keyboard shortcuts. I used to use Spectacle for this, but it’s no longer maintained.
$ brew install --cask topnotch
TopNotch is an app designed to hide the new MacBook Pro notch. I actually don’t mind the notch. I like the app because it makes the menu bar completely black, and I find that more aesthetically pleasing.
And that’s it!
I’ve now installed and configured everything that I use on my new 2021 MacBook Pro. There are a few gems in there worth copying in there. They took some time to investigate and figure out.
But, otherwise, this isn’t a blueprint that you should copy as is. As I said in the introduction, it’s more of a window into what went into my decision process. This means that I expect you to use your judgment to decide what to take away from this article.