
I gave an introduction to continuous integration with WordPress at WordCamp San Diego 2018. This is the companion article that I wrote for it. If you’re just looking for the slides, click here.
Writing high-quality WordPress code is hard to do. It requires constant effort on our part and good self-awareness to know when we slipped up. But, if your business has any sort of success (which we all want!), you’re going to work with more and more people. And many of them are likely to touch with your code.
This is going to put a strain on your development processes. It becomes harder to maintain a certain level of code quality. And you’re no longer the only person making code changes. You’re now part of a team, and you need a way to standardize all of the things you once did on your own.
That’s goal of continuous integration. It lets you automate your different development workflows. This ensures that the quality of your code stays consistent.
Defining continuous integration
Continuous integration is a bit of weird term to define. That’s because it’s a term used to group a whole bunch of different development processes. That said, the idea behind them is pretty simple.
Continuous integration looks to minimize the work required to maintain high-quality code. The way that it does that is by automating as many of your processes as possible. In fact, an ideal continuous integration scenario doesn’t have any manual processes.
In that scenario, the moment that you commit a code change to your main repository, the continuous integration process takes over. It goes through all automated processes and warns you if there are any issues.
Continuous integration is part of two larger practices called continuous delivery and continuous deployment. The goal of these two practices is to speed up and automate the process of building, testing and deploying software. Here’s a graph (original inspiration here) highlighting all the processes involved in continuous delivery and continuous deployment:
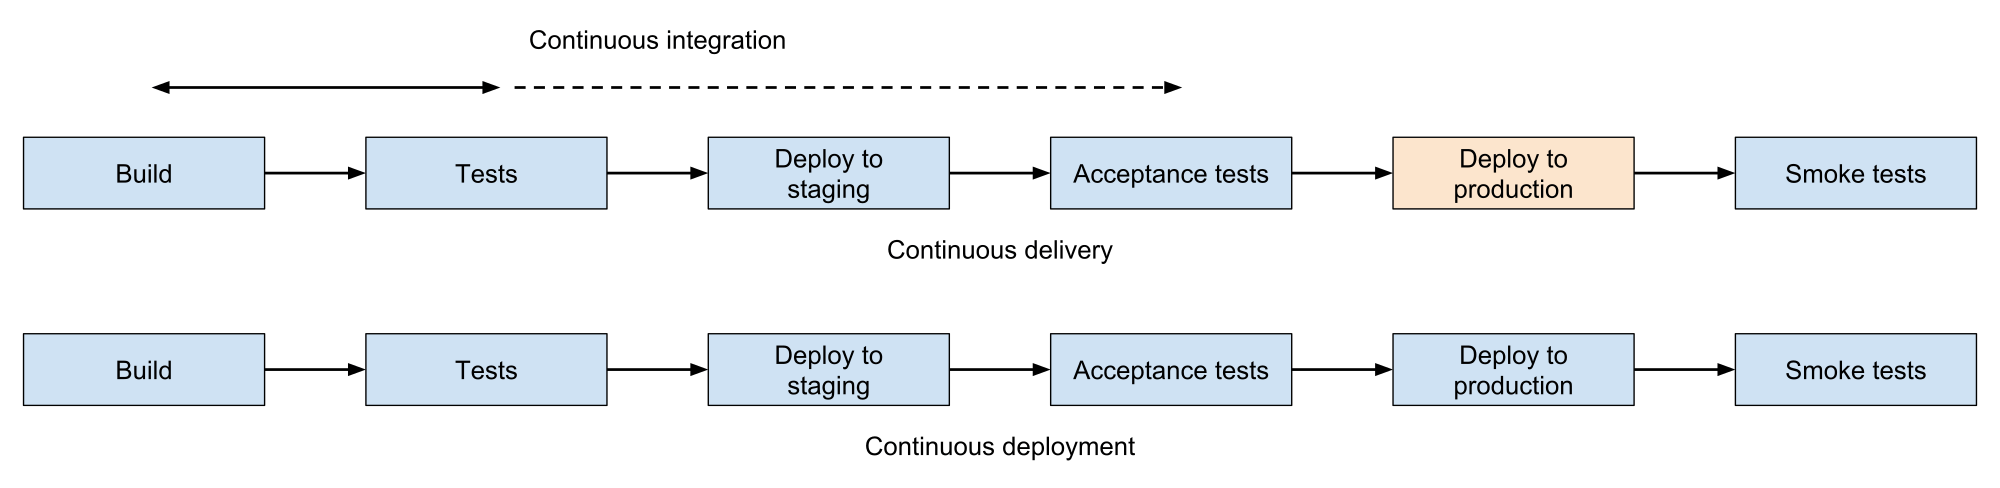
You’ll notice that continuous integration only covers a small fraction of the continuous deployment process. Depending on how you do acceptance testing, it’s possible that those fit within your continuous integration process as well. That said, the two main processes, build and tests, are always present.
It’s also worth noting that there’s only one difference between continuous delivery and continuous deployment. It’s the deployment step at the end. With continuous deployment, the deployment step always happens, and it’s automatic.
But, with continuous delivery, that’s not the case. You can deploy your changes at any time like continuous deployment. But, instead of making that process automatic, it’s done manually. (Often for business reasons.)
Continuous integration processes
Now, let’s talk about all the different processes in this graph. The first one is the build process. The build process is in charge of building the new version of your software. This can be as simple as just checking out code from your repository. But, if you use a lot of JavaScript or preprocessed CSS (like less or sass), this process can be more complex.
Once we have a new version of your software, the next step is to test it. Testing can mean different things to different people. (Especially in the WordPress ecosystem!) But, with continuous integration, what it really means is run your software’s unit test suite. (You can read more about unit testing and how to write unit tests for WordPress here.)
If the testing process passes without errors, the next step is to deploy your software to a staging server. This is where the continuous integration process can vary a lot. That’s why the graph didn’t highlight these processes the same as the first two steps.
First, not everyone has a staging server. If you use a good WordPress host, they often come with one. That said, it’s also possible to configure a staging site right in your continuous integration system as well.
On top of that, not everyone does acceptance testing for their software. (Although, it’s a good idea to do it as well!) If you’re not familiar with acceptance testing, it’s a type of testing that you’ll find in all engineering disciplines. You use it to ensure that your software behaves as designed.
In software engineering, acceptance testing is also called “User acceptance testing”. That’s because we use it to test that our software satisfies the requirements of your client, customer or user. That’s also why a staging server is often necessary to do acceptance testing.
Why do we need continuous integration?
Nowadays, it’s common (if not expected) for development teams to commit code often. For some, it’s because they develop code using agile and extreme programming. For others, it’s because they follow software development philosophies like “Release early, release often“.
There’s no question that committing code often has a lot of benefits. (That’s why so many of us do it!) But, while there might be a lot of benefits to working this way, it’s not without issues either. There are also real costs to it that you want to minimize.
There are two main issues that you want to prevent when your development team is committing code often. First, you want to be able to ensure that the quality of the code committed is up to your team’s standards. There’s no advantage to committing code more often if you can’t maintain a good code quality level.
The other issue that you want to prevent is errors. If everyone is committing code more often, the odds of errors making it into the code goes up as well. But, if everyone is trying to commit code more often, these errors can end up preventing people from working. So, it becomes critical to prevent these errors from slipping into the code.
The main goal of continuous integration is fixing those two issues. This is also what makes continuous integration so useful. With it, your team can commit code as often as they want without having to worry about code quality or errors. (It’s magic!)
Prerequisites for continuous integration
Alright, so this all sounds pretty awesome! How can you get this wonderful system working for your code? Well, that’s where things get a bit more complicated.
Continuous integration isn’t a system that exists on its own. As we’ve been seeing, it relies on other processes and tools to do its job. It’s important to have some (if not all) of those processes in place so that you and your team can use continuous integration.
Version control system
The biggest must-have is the use of a version control system. For most of us, that means git. But Mercurial and Subversion (SVN) are also possible options.
Why is a version control system necessary? Well, first of all, they’re almost necessary if you work in a team environment. In those environments, you need to share your code with others, and a version control system is the best way to do that.
But, with continuous integration, you don’t only need to be able to share code with others. You also need to be able to share it with your continuous integration system. That’s because it needs a copy of your code to perform code quality checks and to run your testing suites.
Automated test suite
This brings us to the next prerequisite: having an automated test suite. While not as strong of a requirement as a version control system, it’s still almost mandatory. But what do we mean by an automated test suite?
It means having a set of tests (most often unit tests) that can be run by your continuous integration system. The goal of those tests is to increase the confidence that you have in your code. This goes back to what we talked about earlier. If you want your team to commit code often, you have to be sure that their code doesn’t prevent others from working.
But that’s not the only benefit of having an automated test suite. An automated test suite also helps fix some bugs sooner. That’s because a developer will get alerted right away if they broke something. They can go ahead and fix it right away before they’re absorbed by their next task.
Code quality tools
The last thing that you should consider using with continuous integration is code quality tools. These are tools that monitor the quality of your code. They alert you when the quality of your code falls below a certain threshold. Or if your code doesn’t follow some coding standard.
The primary tool used by WordPress (and PHP) developers to do that is PHP code sniffer (also known as phpcs). It’s a tool for enforcing coding standards. By default, it tries to enforce the PEAR coding standards.
That said, you can also use it to enforce any coding standard that you want. For example, there are rules for the WordPress coding standards. These are the rules that most of you will want to use with your continuous integration system. They enforce the PHP coding standards used by the WordPress project and most of the WordPress community.
While PHP code sniffer is without a doubt the most used code quality tool, it isn’t the only one at your disposal either. And neither should you rely on a single tool to monitor the quality of your code. There are other tools that monitor other code quality aspects that aren’t coding standards.
Other tools that you should consider using are PHP mess detector and PHP copy/paste detector. What PHP copy/paste detector does is pretty self-explanatory. It looks for duplicated lines of code in your code and warns you about them.
PHP mess detector is a more general purpose tool. You use detect structural problems with your code. For example, it can warn you if some of your functions or methods are too complex.
Piecing it together
Alright, so that’s enough on theory and prerequisites! Now, let’s look at how you can put all this together into a complete continuous integration workflow. In terms of possible workflows, we’re going to look at two types of them: local or hosted.
Local
So why would you want to put together a local continuous integration workflow? Isn’t the whole point of continuous integration to check the work of your whole team and not just yours? That’s true, but that doesn’t mean that creating a local continuous integration workflow isn’t a good idea. That’s because a local continuous integration workflow has several advantages.
First, it’s a lot a lot easier to get up and running than using a service. With a service, you have to register to it, set up your repository to use it and then configure it. That’s a lot of work!
If you’re just trying to get a feel for continuous integration, this can all feel quite daunting. That’s why doing things locally can be a good starting point. You can test things on your own without as much of a time investment.
But that time invest is often not wasted either. The work that you put configuring a local continuous integration workflow is often still good when you want to start using a service. All that you’re doing is configuring the service to do the things that you’re doing locally.
GrumPHP
The best (and only!) tool to develop a local continuous integration workflow is GrumPHP. GrumPHP is a tool that you can configure to run code quality tools whenever you commit code. It supports all the code quality tools that we’ve discussed so far and more! (You can view all the code quality checks that it supports here.)
How does it work? Well, GrumPHP leverages a feature of git called git hooks. This is a lot like WordPress hooks in the sense that it lets developers run custom scripts while git runs. Here, GrumPHP uses these git hooks to run the code quality checks that you configured.
This means that, once someone has GrumPHP installed for a project, they can’t commit code without them running. (Well, they could commit code without having the git hooks run. But then you should make them feel bad about it!) This is exactly like the continuous integration process that we described earlier.
Note: If you’re looking to learn more about GrumPHP, there’s an entire article dedicated to it.
Limitations of a local workflow
That said, there’s one important difference between GrumPHP and a continuous integration service. It’s that all the code quality checks run on each developers machine. They’re not done on a specific environment that you can control.
This might seem obvious to you. After all, we’re talking about how to create a local continuous integration workflow! But this can have some unforeseen consequences.
For example, code quality checks could fail because of difference between development environments. In the same vein, because you only test in a development environment, you might not be able to detect production environment issues. So that’s always something to keep in mind if you decide to use GrumPHP.
This doesn’t change the fact that GrumPHP is an excellent tool to get started with continuous integration. It should still be part of your continuous integration workflow even if you use a service. That’s because it’s always good to detect issues before code gets pushed to a repository. And, on top of that, your continuous integration service can still use GrumPHP to perform parts of its job.
Hosted services
The second category of continuous integration systems that we’ll look at are the ones that are hosted. These are continuous integration systems that are hosted as services in the cloud. Although, some can also be self-hosted. We’re not going to look at them due to the complexity of setting them up and maintaining them.
This is a very broad category and we can’t cover all the possible options that are at your disposal. We’re going to have to use some criteria to limit which one we’re going to look at. We’ll focus on the ones that have some support or documentation for WordPress. These are in alphabetical order (and sorry if you’re left out!):
- Bitbucket Pipelines
- Buddy
- CircleCI
- GitLab CI
- Travis CI
We’ll start by covering a lot of the common features of all these services. Then we’ll go over each of them. This will allow us to focus on the unique differences and why you might want to use them over one of the other options.
Free tier
Let’s start by talking a bit about pricing! While all these services have different pricing plans, they also all have free tiers. That’s always important when you’re trying to figure out how these services work.
But it’s also relevant because most of us don’t need more than a free tier. Paid tiers are only relevant for larger agencies or companies. For most small companies or freelancers, the free tier is more than adequate for your needs.
It’s still worth noting that not all these services have the same free tiers. Some of them have a free tier, but also have additional perks for open source projects. An example of this is CircleCI. They have a free tier with one container, but you’ll get three more for open source projects.
So, if you want to use continuous integration with an open source project, these potential perks might sway your decision. But otherwise, you’ll find that most free tiers are roughly the same. They’ll allow you to use continuous integration workflow for free.
YAML configuration
The next point in common with all the continuous integration services is their configuration files. All of them use YAML. If you’re familiar with YAML, it’s a language used to store data structures and objects. It’s very popular because it’s easy to read.
sudo: false

language: php

notifications:
  email:
    on_success: never
    on_failure: change

php:
  - 7.2
  - 7.1
  - 7.0
  - 5.6
  - 5.5
  - 5.4

env:
  - WP_VERSION=latest

before_script:
  - composer self-update
  - composer install -o --prefer-dist --no-interaction
  - bash tests/bin/install-wp.sh $WP_VERSION

script: vendor/bin/phpunit
Here’s an example of a Travis CI configuration file. We’re not going to over what each part of it does. But, at a glance, it’s easy for you to see a few things.
First, we can see that we’re testing something written in PHP because of language: php. We also know what versions of PHP we’re testing against because of the php section a bit further down.
What’s a bit harder to see is that we’re also dealing with WordPress. The first hint of it is in the env section. We define a WP_VERSION environment variable for the WordPress version.
We then use that environment variable in the before_script section to install a specific WordPress version. We do that by having bash run the install-wp.sh script. We pass it WP_VERSION as an argument to tell it which version of WordPress to install. For this, we only want the latest version.
It’s worth mentioning again that we’re only using the Travis CI configuration file as an example. All the continuous integration services that we’re seeing also use YAML. So while their YAML structure might be different from this one, they’re all as easy to read.
Connects to your repository
And speaking of configuration files! This is a good way to bring up another thing that all these continuous integration services have in common. It’s that they all integrate with your version control system.
However, it’s worth pointing out that all the continuous integration services that we’re looking at only support git. And not all of them support the same git repository hosting providers. Although, a lot of them support GitHub. (We’ll talk about why some of them don’t a bit later.)
So why do all these services integrate with your git repository provider? Well, it’s how they can know whenever you commit code. This, in turn, allows them to start validating your commits right away. You don’t have to tell them to do it by hand.
It also allows them to validate commits on different branches of your repository. As well as on any pull requests that your repository might receive. This integration is really what makes this automated process possible.
WP-CLI support
This brings us to the last common (but not universal) feature of these continuous integration services. It’s that the WP-CLI scaffold command is able to set up an initial continuous integration workflow for you. It can do it not only for setting up tests for a plugin but also setting up tests for a theme.
Having WP-CLI support makes it even easier for you to start using these continuous integration services. You can just run the scaffold command with your chosen service and you’re good to go! The only thing worth noting is that there’s currently no support for Buddy with the scaffold command.
Looking at each service
So this wraps up the common (or almost common!) features of these continuous integration services. Next, we’re going to go over each of them individually. This will allow us to go some of the unique features of each service.
Bitbucket pipelines
Let’s start with Bitbucket pipelines. Bitbucket pipelines isn’t like the majority of the other continuous integration services that we’re going to look at. (With the exception of GitLab CI.) That difference is that Bitbucket pipelines isn’t a standalone product.
Instead, it’s a feature that comes with the entire Bitbucket platform. This means that, if you don’t use Bitbucket, you can’t use Bitbucket pipelines. But, if you’re already invested in Atlassian products, Bitbucket pipelines might just be the right service for you!
Buddy
Next is Buddy. Buddy has a lot of unique features that set it apart from all the other continuous integration services. So there’s a bit more to talk about.
The biggest one (and also the most appealing one for anyone starting to use continuous integration) is their GUI. With Buddy, you don’t have to use a YAML file if you don’t want to. Instead, you can just use their UI to build your continuous integration workflow. They have predefined actions for almost anything that you could want to do.
All that you have to do is piece them together using their UI. This gives you what they call a pipeline. And you can have as many of those as you want per project as you want.

The other cool feature of Buddy is their sandboxes. Buddy can create a server where you can see the latest changes to your code. You can also have sandboxes for branches. That way, you can see the changes in a pull request and compare them to your master branch if you want.
If you don’t already use staging servers, you pretty much get the benefits of having one for free. That’s because you can share the URL to the sandbox with anyone. This allows you to show potential changes to clients, designers or managers. (Anyone else you might review these changes with really.)
Buddy also has quite a few guides that relate to WordPress. That said, most of them focus on automating your WordPress deployment. None of them cover how to implement continuous integration with WordPress.
CircleCI
CircleCI is, without a doubt, one of the most powerful continuous integration services that we’re going to see. This does come with a bit of learning curve. That said, they also have some of the most thorough documentation out of all the continuous integration services that we’ll look at.
One of the reasons why CircleCI is so powerful is because it’s so flexible. You can configure it pretty much anyway that you want. It supports any type of workflow whether it’s parallel execution or per branch execution. (Or both if you want!)
But is there anything that you can you do with CircleCI that you can’t do with the continuous integration services? Yes, the biggest one is that you can actually access the service using SSH. This is especially useful if you want to debug a failed step in your continuous integration workflow. (It’s also great to debug issues while you’re building your continuous integration workflow too!)
If you’re already using Pantheon as a host, they’re also pretty committed to CircleCI. They have documentation and sample projects that you can refer to. These explain how to build continuous integration workflows with CircleCI and Pantheon. You can use these workflows not only to test a WordPress project but also do acceptance testing on a plugin.
GitLab CI
There isn’t too much to say about GitLab CI besides that it’s a lot like Bitbucket Pipelines. It’s not a standalone continuous integration service but a feature of GitLab. But, unlike Bitbucket Pipelines, you can use it other git repository hosting providers.
That’s because GitLab supports repository mirroring. This allows you to mirror a repository hosted elsewhere into GitLab. Once GitLab mirrors your repository, you can use its continuous integration feature on your project.
Travis CI
The next continuous integration service that we’ll look at is Travis CI. It used to be the de facto service used by open source projects on GitHub. In fact, until recently, if you’d ever heard of a continuous integration service, there’s a good chance it was Travis CI.
It’s worth pointing out that Travis only supports GitHub. This tends to not be much of a deal breaker for most developers since most of us are on GitHub. That said, that doesn’t mean that you’re using GitHub for work. So that can limit whether you can use Travis or not.
Now, there’s one feature that used to distinguish Travis from the other continuous integration services. It’s the build matrix. This is a feature that some plugin shops and larger agencies consider a must-have.
What does the build matrix do? Well, for WordPress, it lets you specify all the PHP and WordPress versions that you want to test. Travis will then perform tests on all the possible combinations of those PHP and WordPress versions.
As you can imagine, if you’re a plugin shop, this is super useful. Customers will install your plugin on a wide range of PHP and WordPress versions. Travis’s build matrix feature lets you test all these possible combinations effortlessly. (That’s why some people consider it a must-have feature.)
GitHub Actions
This last continuous integration service is the newest entrant in the market. GitHub Actions came out late 2019, but it already had a ton of useful features. For example, it supports the very popular build matrix that Travis CI popularized. It also allows you to create custom actions.
What are custom actions? Well, let’s say you need to install a specific version of PHP for testing. You’d have specific workflow steps for that. Custom actions lets you package those steps so you can reuse them between projects.
Now, this isn’t a revolutionary feature. Circle CI already has orbs which does exactly that. But what really sets GitHub Actions apart from the other platforms is the sheer amount of open source custom actions available.
To go back to our PHP example, you can use this custom action to manage your PHP version. There are also custom actions to help you publish your WordPress plugin on the plugin repository. Whatever your needs, there’s a good chance you’ll find a custom action for it through the GitHub Marketplace.
In terms of what you can get for free, GitHub Actions offers the most. If you have a lot of public repositories, GitHub Actions is free with no limits. Something Travis CI used to offer, but doesn’t anymore. For private repositories, you get 2,000 minutes per month, which is more than enough unless you have a very slow test suite. (For example, Ymir has a test suite that runs for over an hour and a half.)
Setting up your first continuous integration workflow
Alright, so this covers some of the different continuous integration services that you can use! Now, let’s look at how you can set up your first continuous integration workflow. This is only going to be a simple overview of how you can do it since these workflows can get quite complex.
Leveraging WP-CLI
Like we mentioned earlier, all the services that we saw (with the exception of Buddy) support WP-CLI. So we’ll look at how WP-CLI scaffolds WordPress PHP unit tests with a continuous integration service. The first step is to use WP-CLI to create all the necessary files:
$ wp scaffold plugin-tests my-plugin --ci=<service>
This is the scaffold command that you want to use to set up continuous integration with your plugin. You just need to replace my-plugin with the name of your plugin as found in your plugins directory. You can also choose the continuous integration service that you want to use. (By default, WP-CLI will configure your tests to run on Travis CI.)
$ wp scaffold theme-tests my-theme --ci=<service>
You can use WP-CLI to set up tests for your theme as well. You can see from the above command that it’s almost the same as the one for plugins. And, like with plugins, you can also choose which continuous integration service WP-CLI will configure.
What do you get?
Alright, so we ran the scaffold command, and WP-CLI generated some files for us! It doesn’t matter which continuous integration service you chose either. We’re going to keep this service agnostic.
So what were the files that the scaffold command generated for us? Well, there’s the obvious continuous integration configuration file such as .travis.yml. But it also creates the configuration files for the tools that our continuous integration workflow will use.
There’s phpcs.ruleset.xml that configures the active rules for PHP code sniffer. There’s also phpunit.xml.dist which is the configuration file for PHPUnit. PHPUnit is the testing framework that will run all the tests found in the tests folder which was also created by the scaffold command.
Connecting our plugin repository
The last thing that’s left to do is connect your plugin or theme repository to your chosen continuous integration service. To do that, you need to authorize it to read your GitHub (and sometimes Bitbucket) repository. This will allow it to read the configuration file generated by the scaffold command.
It’s worth noting that, if you chose to use GitLab or Bitbucket Pipelines, there’s nothing to do here. As we saw earlier, those two continuous integration services are part of these two products. So you just need to commit the configuration file and push it to the repository.
Included processes
At that point, the continuous integration workflow will start. This workflow consists of two processes. The first one is checking for code style issues using PHP code sniffer. The other is running the WordPress unit tests using PHPUnit.
These two processes won’t only run once either. They’re going to run multiple times on a mix of PHP and WordPress versions. This mix of PHP and WordPress versions will vary depending on the continuous integration service.
As a general rule, all the services support PHP 5.6 or newer versions. If you need to support older versions of PHP, there’s only one service that has native support for them. That’s Travis CI.
A modern development approach
And this concludes our look at continuous integration! As you can see, it’s a huge topic. There are a lot of different services that you can use. And, on top of that, you can customize them any way that you want.
That said, the important thing is to look to automate the processes that you already have. That’s where a tool like GrumPHP can be really useful. That’s because it integrates with almost every tool in the PHP ecosystem. So it’s unlikely that it doesn’t support the tools that you’re using already.
And, if you don’t have any sort of processes in place already, then you can use the WP-CLI scaffold command. This will set up an initial continuous workflow for you with the service of your choice. The workflow will check for code styling issues and run a test suite for you.
Automating these two jobs is often the foundation of any continuous integration workflow. So having WP-CLI do it for you is a great way to get started with continuous integration. And with that, you’ll be well on your way to ensuring that the code quality of you and your team stays consistent.